In addition to all the immigrants that I targeted, I spent a good amount of time on some of the native species of Florida as well. My target list here was much more refined, mostly hard to record species and rare vocalizations, and so my success rate was a bit lower. But by the time my trip was over I still managed to get a nice collection of cool recordings, with a nice smattering of rare ones thrown in:
Mottled Duck is a surprisingly rarely recorded species. Maybe that’s because it’s just a glorified Mallard – or maybe the opposite of glorified, being less colorful. Or maybe it’s because it can be hard to find pure birds anymore in places most people bird. Whatever the case, it was a major goal of mine to get some recordings from them, and I did from both hybrids and apparently pure birds:
Mottled Duck, Wakodahatchee Wetlands, copyright Andrew Spencer
It wasn’t all that long ago that I didn’t even know that Bachman’s Sparrow had a flight song. As soon as I heard about it I had to go record it! And it took a little effort, but eventually I found a pair of birds with an older juvenile late one evening that made all sorts of cool sounds, including the “flight” song a few times (but always while perched). I also recorded a variety of calls from them, and their beautiful primary song.
Bachman's Sparrow, Three Lakes WMA, copyright Andrew Spencer
Not surprisingly, a number of the bird I was looking for were found on the Florida Keys. High among these were White-crowned Pigeon and Black-whiskered Vireo (especially calls of both, which are rarely recorded), but I also recorded a few other fun species such as Antillean Nighthawk and Gray Kingbird.
Not really on the target list, but still a very cool (and unique) bird, I was able to get some good cuts of Limpkin near Miami while I was looking for Swamphens. I was most surprised to learn that they actually make a very distinct winnowing sound while flying in an apparent display flight, and was very pleased to get a recording of it.
Limpkin, Pembroke Pines, copyright Andrew Spencer
One of the major highlights of my trip was recording in the Everglades. I’ll admit, I got very few recordings there, BUT I did get one of my most wanted – Cape Sable Seaside Sparrow. And in addition to getting good recs I had spectacular views as well, a rarity for this endangered subspecies.
"Cape Sable" Seaside Sparrow, Everglades National Park, copyright Andrew Spencer
While using just a basic program such as Raven Lite will be sufficient for many recordists, you may find yourself wishing you had a more versatile program for fine-tuning your recordings. If this is the case the one I recommend is Adobe Audition. It isn’t cheap – but it is a fully professional sound-editing tool and will let you do pretty much anything you want with your sounds.
In this post I will take a sound from a raw unedited start to what I consider a finished state. Some of the editing techniques below are the same as what you can do in Raven Lite, while others will be entirely new.
Before I start writing about various ways to manipulate a recording let me stress that the cardinal rule of editing a bird sound is to not alter the target signal itself. The example I use below is a pretty simple bird sound, so it is easy to not mess with the actual song. However in more complex cases you will not be able to use many of these methods quite as thoroughly. Use your best judgment and look carefully at the sonogram before starting any editing procedures.
Disclaimer: to best hear the results of the methods below I recommend using headphones when listening to the examples. You can also see larger images of all the sonograms and pictures below by clicking on them…this will be especially useful to see the finer details of the results of some of the editing.
Step One: Crop
As before, the first step is to crop out the audio you want to edit. Audition has the HUGE advantage of being able to load and edit cuts longer than the one minute limit of Raven Lite, and you don’t have to worry about any of that annoying copying and pasting to get longer clips. In the Waveform Display view, you use the Time Selection Tool to select a portion of the recording that you want to remove, and then go to “Edit”, “Delete Selection”, or simply just hit the “delete” key on your keyboard.
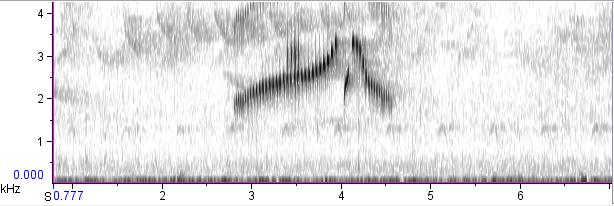
Striolated Puffbird, Cristalino Jungle Lodge, Brazil. This will be the test case for the methods details below; here it is untouched except that I cropped this sample out from the original, and amplified it some to better show the differences that editing will have on it.
Step Two: Filter
This is actually more like three or four steps with Audition. I have gotten in to the habit of removing the low frequency rumble entirely, so I will describe my method for that first, then an alternate method later.
Using the Marquee Selection Tool, select the frequency range you want to remove…for most of my recordings this is from about 350-380 hertz (hz) and lower. Then go to “Edit”, “Delete Selection”. This will remove the frequency range you’ve selected, similar to using the “filter out selection” feature in Raven Lite.
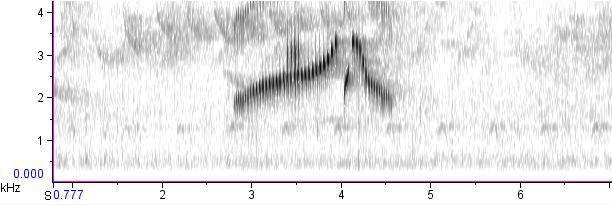
Striolated Puffbird with all frequencies below 350hz removed.
Notice how on this recording there is still a band of louder low frequency noise. This is where what is perhaps Audition’s most useful tool comes in handy. Hit “Ctrl A” on the keyboard to select the entire sound, and go to “Effects”, “Filter and EQ”, “FFT Filter”.
You will see this weird box with a straight line come up. This handy feature allows you to select frequency ranges and amplify or deamplify them as much as you want. For most my recordings I amplify from a minimum amount at 750 or 800hz to around –15dB at 400hz. To place points on the line click at the approximate frequency you want the point to appear. Next right click on the point, and type in the frequency and how much you would like it amplified or deamplified. The beauty of the FFT filter is that you can smoothly deamplify across a range of frequencies, so that no abrupt “line” is apparent. Notice how after applying the filter below the band of low frequency noise is the same strength as the sounds immediately above it.
FFT Filter window. Here the sound is filtered from 750hz in a cline down to 400hz at -15dB.Striolated Puffbird after applying the FFT filter above.
But wait! The FFT filter is useful for far more than just deamplifying a small low frequency noise band. Notice that very noisy and very, very annoying band of insect noise around 3 kilohertz (khz)? Well, let’s kill it! The first step in removing insect noise is to figure out what frequencies it covers. I take the cursor and go first to just below the lower edge of the recording, and then to just above the upper one and write down those frequencies. Then I either figure out the halfway point, or the frequency of the most powerful part of the noise.
FFT filter window showing how to deamplify a frequency band in the middle of a recording, in this case with from a range of 2500 Hz to 3500 Hz, with a midpoint of 3000 Hz deamplified -25dB.
Now, back at the FFT filter window you will have to enter three points onto the graph. The first and third will be your high and low points, with an amplification of zero decibels (0 dB). The second will be the one in the middle or the height of the bug noise. For this one you can experiment with different values until you get the effect you want. Or you can compare the amplitude from the noisy part of the recording to the frequencies you used as the upper and lower bounds, and deamplify by that amount.
Striolated Puffbird with the main band of bug noise deamplified.
As a final step in the filtering process I also deamplified those two smaller bands of bug noise over the first part of the cut. You can deamplify portions of the sound by using the Marquee Selection Tool to select just the areas you want to deamplify, instead of applying the filter to the whole cut.
Remember how I promised to talk about another way to filter that lowest band of low frequency noise? Well, you can also use the FFT filter to deamplify the rumble at the bottom of the spectrum to a lower level, rather than just removing it. I remove it as a matter of personal preference, but many people prefer to leave even the lowest frequencies in their recordings and feel that it gives the cut a more natural sound.
Step Three: Clean-up
Notice all those popping and clicking sounds in this recording? Those are from a combination of handling noise – I was trying to find the bird for some clients I was leading while recording it, and thus moving around a lot – and also noise from said clients moving around. Many recordings have at least some handling noise, and it can range from merely a small annoyance to downright dreadful.
Audition offers a couple of ways to remove handling noise. The one I usually use is to select a small sliver of “clean” sound with the Marquee Selection Tool and paste it over the noisy section I want to replace. I typically try to select a piece of clean sound from close to the noisy part, but sometimes this isn’t possible. In this particular recording, note the nice clean section from 5.8 seconds to 6.6 seconds that could be used as a source of replacement sound.
Once you’ve selected the sound you are going to use to replace the noisy section, click a point on the spectrogram immediately before the part you are going to replace, and use the “mix paste” function to replace it. You can find this under the edit menu, or by using the “Ctrl+shift V” shortcut. Once you have the “mix paste” window up, click on “replace” rather than “mix”, and voila! The noisy sound will be replaced by the quieter one.
Striolated Puffbird with most of the handling noise removed. Note the quiet rustle that overlaps with the first note of the bird song that I did not remove because it overlapped with the target signal (and the harmonics thereof).
Another way to remove annoying clicks and pops is to use the “Spot Healing Brush” – this has comparable results, but I tend to use the method detailed above as a personal preference. Both these ways of removing background clicks and pops could also be used to remove other background noises — I quite often end up having to “mix paste” over some quiet talking in the background, for example. But I pretty much never remove natural background sounds, whether they be other bird species vocalizing, the noise of wings in flight, the sound of the target bird itself moving, etc. Again this comes down to personal preference, but I would rather have the sound be a better representation of the situation the bird was in than a completely sterile cut with nothing but the target species.
Step Four: Amplify
This step can actually be done at any stage in the process. I left it for the end in this discussion, but just as often I amplify right at the beginning, immediately after cropping. I actually amplified this particular recording before any of the steps I detailed above, for ease of illustration in this post.
For amplification it is best to be in the Waveform Display window, since this allows you to see whether or not the sound is clipping from over-amplification.
There are two ways you can amplify the recording. The first is to use the amplification tool, found under the edit menu, on the amplification tab. This amplifies it by a decibel (dB) amount, which I find hard to visualize. You can, however, use the Waveform Display to see how many dB the peak amplitude of the recording is below the max-out point, and then amplify by an amount less than the difference of those two numbers.
The other option is to use the “normalize” feature, also under the edit menu, amplification tab. This allows you to amplify the sound to some percentage of the maximum amplification possible. So, if you normalize to 100% it will amplify the recording to a point just below clipping. 50% will be halfway between no sound and maximum sound, and so forth. With this particular sound I will not amplify it any more than I already have, as the signal to noise ratio isn’t high enough (in my opinion). Many thanks to K. Cowcill for making me aware of this method.
Other Features
I will be the first to admit I barely scratch the surface of what Audition can do. The number of tools that you can use to tweak every aspect of your sound is simply staggering, and if you do some digging you will doubtless find additional ways of editing your sound that I haven’t talked about. One last method of filtering that I will discuss here goes way beyond the techniques I talked about above. It is also rather sketchy if you’re a purist about not touching the actual target signal itself. It is called dehissing, and it allows you to remove or deamplify ALL the background noise of your recording, leaving the target signal clearer.
But dehissing often doesn’t work well on certain types of bird sounds. I’ve found that it works best with clear whistles with little or no modulation; sounds that contain more noise or cover a broader frequency spectrum will be unacceptably altered by this process. I tend to not use dehissing much except in the rare case when I have heavy water or wind noise combined with a clear enough bird vocalization to make for an reasonable result.
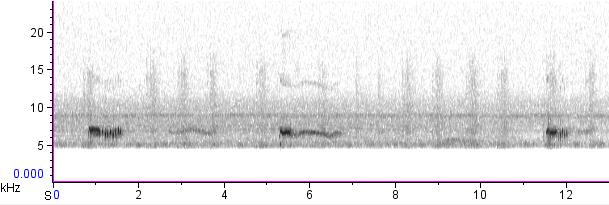
Pheasant Cuckoo, Cristalino Jungle Lodge, Brazil. Note the heavy hiss from a nearby river.
Note the heavy background noise in this recording. While it would be possible to edit this cut in such a away that the background noise will be much less apparent by using the more standard techniques I talked about earlier, it would be impossible to be completely rid of a rather unpleasant amount of hissing. So, to filter the recording using the dehiss method, select the whole recording and go to “edit”, “restore”, “hiss reduction”. You’ll immediately notice a large number of options in this window, and I will freely admit that I don’t entirely understand how they all work. I typically set the precision rate at 40, the transition width at 7 dB, the spectral decay rate at 65%, and the hiss reduction amount at a varying number depending on how loud the background noise is. Finally, on the noise floor adjust level on the slider on the left, I use a number between 8 and 11, usually with some experimentation to see what results.
Pheasant Cuckoo with the hiss reduction filter applied.
Note how the hiss reduction filter more uniformly removes background noise than is possible with just the FFT filter.
I chose this sample to illustrate a tiny portion of what Audition is capable of doing…experiment with it some, be sure to save untampered originals, and let me know if you find any other useful features I haven’t talked about here!
Once you’ve come back from the field with a card full of new audio, renamed the files, and backed everything up, you may want to think about editing your sounds. While having untouched originals is useful if you’re doing scientific analyses, editing portions of the sound for posting on the internet, sending to friends, using for quizzes, etc. can make it easier to get your sound out there and heard by others.
Pretty much all the tracks used on commercial CDs of bird sounds have been edited to one degree or another, often quite heavily. Just because the recordings on, say, the Stokes Field Guide To Bird Songs sound like they were recorded in a sound room with no background noise doesn’t mean they were; quite likely most of them were the target of skillful and careful editing to bring out the target species in the recording.
I use two different programs to edit sounds. The first is Raven Lite, available free from the Macaulay Library. Though somewhat limited in its abilities, it does let you do some basic editing that, for many, will be sufficient for their sound editing needs. Detailed below is my normal process for editing recordings in Raven Lite.
Disclaimer: to best hear the results of the methods below I recommend using headphones when listening to the examples. Low frequency sounds are hard to hear over laptop speakers and small external speakers, so if you don’t hear a difference in the examples below that may be the problem.
Step One: Crop
First off I load the original recording. The first step is to select the part of the sound you want to edit…usually for me this involves cutting out any talking I did into the mic at the end of the cut, and sometime some severe handling noise from the beginning. Quite often the loaded sound is longer than the one minute maximum that Raven imposes on files…longer than that and you can’t edit it, and you have to save it in one-minute chunks. There are two ways to deal with this:
select a one minute piece that you want to have as the final edited sound and “save selection as” for your new file that you will edit, OR
copy one minute chunks and paste them into a completely new file, one after the other.
Using the second method you can get up to about three minutes of your recording into an editable file before Raven runs out of memory. Once you get over those amounts you have to create two or more files to edit and then paste them together using another program (I recommend Audacity).
Step Two: Filter
Once I have a manageable section of audio to edit, I filter out low frequency rumble (discussed in the “extra credit” box at the bottom of the Noise page), which is present in all recordings below 300-400 Hz or so. It’s more noticeable if you are recording in noisy conditions, and less noticeable if you are recording a very loud bird and the gain was turned way down.
Filtering out this low frequency band of noise can have varying consequences. If you were recording in a quiet environment it typically makes the target signal easier to hear and the whole recording more pleasant to listen to. However, if you were recording somewhere with increased background noise, such as traffic, it has the effect of making any noise that you didn’t filter out (i.e., the low frequency noise above what you filtered out) sound tinnier and unpleasant. When this is the case, there are several options. First, you can filter out a larger frequency band than normal, but this often results in a “hissy” tone to the whole recording, as in the following example:
Golden-crowned Spadebill, Cristalino Jungle Lodge, Brazil. This recording has been too agressively filtered...note the high-pitched hissy sound of the recording.
On the other extreme, you can actually filter less of the low frequency band than you would normally; quite often the whole recording will sound better with less filtered in such cases than with more. (In an upcoming post I’ll discuss advanced techniques for filtering out low-frequency noise, including frequency replacement.)
To remove the low frequency band in Raven Lite, select the frequency band you want to filter out (vertically), and then expand it horizontally to cover the entire time of the recording. Then go to edit, filter, filter out selection. This method is also useful if there is an especially loud band of insect noise in the recording, a common problem when recording in the tropics. You have to be especially careful to make sure you don’t filter out any of the target signal in these cases, though, since insect sounds are higher frequency and often overlap the bird sound you were recording.
Step Three: Amplify
After filtering, the next step I usually take is amplifying the recording. The amount I amplify is also a bit of a balancing act. When the target signal is quite loud I amplify little or none, whereas when the bird noise is very quiet I tend to amplify more.
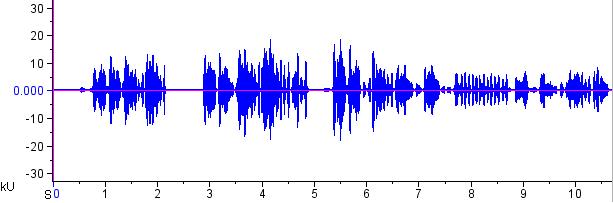
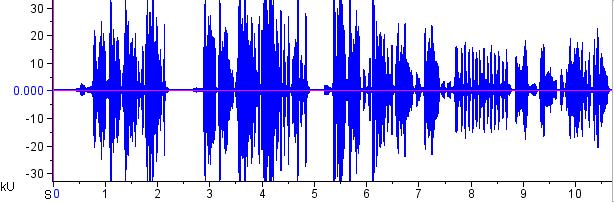
Plain-tailed Wren from Peru, unamplified
The key is not to amplify so much that the recording clips (like in the example below), but to a level approaching that. I tend not to amplify more than four or five times the current levels as this amplifies the background hiss as well, and makes the whole recording sound unpleasant. Experiment a bit with the amplification factor and find the result that sounds best to you.
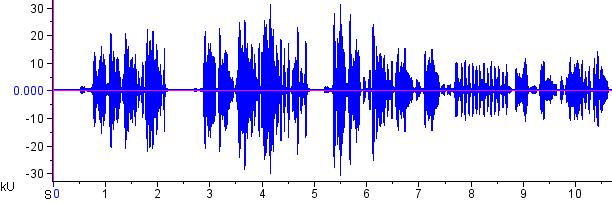
Plain-tailed Wren from Peru, overamplified. Notice how the sound clips at the top and the bottom, and how the sound is distorted.Plain-tailed Wren from Peru, amplified 1.7 times. Note how the peaks come close to clipping, but don't actually max out.
Note that to deamplify you don’t use negative numbers, but fractions…i.e., a 0.9 multiplier deamplifies to 90% of the original level.
On a side note, amplification is one of the few things for which I like Raven Lite better than Audition. With Raven Lite you can pick a multiple amount to amplify by, whereas in Audition you amplify by dB. I find it easier to visualize how amplifying by a multiple will affect the recording, rather than using a more esoteric measurement like decibels.
Extra credit: the images above are waveforms, a graph showing sound amplitude versus time. The higher the peaks on the waveform, the louder the sound. An ideal recording will have the highest peaks possible for the target signal without them maxing, and also having the lowest possible amplitude during the non target signal portions of the recording.
Step Four: Clean-up
Typically my final step when editing a sound in Raven Lite is what I call “clean-up” work: removing handling noise, talking in the background, the sounds of walking, car horns, etc. Note: I personally far prefer Audition over Raven Lite for this step, but back before I started using Audition, here is what I used to do.
Since in Raven Lite you can only cut and paste timed pieces of the recording covering the entire frequency range, you have to replace the whole time span of the sound that contains the unwanted noise. To maintain natural intervals between the bird sounds themselves, I select a piece of sound with no extraneous noise that is the same length of time and paste over the section with the unwanted noise.
At the very end I will often paste a little bit of empty sound at the beginning of the cut to give a bit of lead time until the first vocalization, and sometimes a bit at the end to make the whole recording more “symmetrical”.
If you are getting into nature sound recording, I’ve got a few recommendations for how to manage your recordings as the number of files grows.
Storage
The first thing you need to do is dedicate a storage space either on your computer’s hard drive or on an external hard drive. Unless you’re recording in MP3 format, which doesn’t take up much space, I recommend the external drive. Memory is getting cheaper and cheaper — I just purchased 300 gigabytes for $75 — so it shouldn’t break the bank.
Once you’ve got the drive, you need to decide on a filing system. Personally, I prefer to put all the original (unedited) recordings in a single dedicated folder where they will sort chronologically by filename (see below), but if you prefer to split things up into multiple folders, more power to you. Regardless, I strongly recommend keeping your original files separate from your edited files — the original files should reside in an “inviolate library” from which all else issues.
Filenames
Once you’ve got a place to put your files, make sure you rename them so that you know which one is which. Don’t let them sit around telling you “Scene_162.wav” or “20100312_h13m24s42.wav”.
Good filenames must do the following:
Tell you about the contents of the file (even if only in code);
Never reduplicate or repeat each other.
In my opinion, good filenames should also:
Sort chronologically. Personally, I would never dream of sorting the original audio files by species. For one thing, many of my cuts include the vocalizations of two or three (or ten) different kinds of birds at once. For another thing, it’s frequently important to know the order in which the cuts were recorded on a particular day. Edited files are a different story; I sort those by species, but the originals need to be chronological.
Include information about species, date, and place (and maybe recorder and recordist while you’re at it). This can make for long filenames, so some people might prefer to keep that information in the master index (see below), but I find it very useful to put this information in filenames, which makes the files searchable in several programs.
Here’s a sample filename to show you a system like the one I use:
AJS-2008-06-24-t48-SWTHalarm_YBFLc-CoosCoNH.wav
which includes:
AJS: the initials of the recordist (Andrew J. Spencer);
2008-06-24: the date (in year-month-day format so that files will sort chronologically);
t48: a track number (so that all recordings made on the same day will sort chronologically);
SWTHalarm_YBFLc: notes on the vocalizations recorded (in this case, Swainson’s Thrush alarm calls and Yellow-bellied Flycatcher calls);
CoosCoNH: the location (Coos County, New Hampshire).
To make it feasible to rename dozens or hundreds of files at once, I suggest a batch renaming program. The one I use is called Siren. It’s not very intuitive for beginners, but I love it. Once you learn how to create filename expressions in Siren, you can rename hundreds or thousands of files according to the same pattern, and that pattern can automatically incorporate other parts of the current filename, the date/time the file was created or modified, metadata from the audio ID tags, an increasing series of numbers, or other nifty strings.
Using Siren, I can simultaneously rename a hundred recordings at once, instantly giving them all the recordist’s initials, the date, a unique track number, and a location. Then I can go through and listen to each file, manually adding the vocalization information. The last step takes some time, but twice as much time is saved when I’m looking for something I recorded last year!
Create a Master Index
Somewhere, you’ll need to keep a master list of all the sound files you’ve recorded, and you’ll need to keep it updated. Personally, I use a simple Microsoft Excel spreadsheet that includes more detailed information about each file than the filename can hold: it has columns for filename, date, species, location, recorder, microphone, backups (see below), and comments.
One nifty trick I learned from this webpage was how to add a “Print Directory Listing” option to my Windows right-click menu. Following the instructions on that page, I was able to set up my computer so that when I right-click on a folder, I can choose the option to create a text file with a listing of all the files in the folder. I can import this into Microsoft Excel at the drop of a hat, which makes updating my Master Index a breeze.
Back it up! Now!
Even if you follow none of the above advice, you absolutely must back up your files. I recommend backing them up to DVD because DVDs are relatively durable, portable and spacious. Believe me, investing in a DVD burner is totally worth it if your recording output is going to be measured in hours and gigs rather than minutes and megs.
When it comes to long-term audio archival, you’ll want to investigate other options, most of which are beyond the scope of this post. However, I will mention that you might want to consider donating your recordings to a research archive. That way, your recordings will be available to researchers in the future — including you, if disaster strikes your original data and your backups.