This past weekend I made my annual field trip to the Western Field Ornithologists’ conference in Palm Desert, California. Unfortunately, I had little opportunity to get out and make recordings in the field – it was a particular shame to miss out on recording at the Salton Sea, where (if you find the right spot) the most disruptive background sound usually comes from other birds, not from humans or vehicles. However, I did get to use a microphone a little bit during the Field Sound Recording Workshop that I ran on Saturday morning. While demonstrating the use of a parabola for some of the workshop participants, I was able to record these interesting sounds from a nervous flock of Gambel’s Quail:
In preparation for the workshop I drew up a brief list of equipment recommendations for those who would like to get into sound recording. I had long hesitated to do this, because I’m really not a gearhead at all – I basically know just enough about audio recording equipment to use it properly. But requests for gear recommendations are probably the single most common question that I field, and I felt it would be of use to readers if I posted the resulting info to my blog.
So, from now on you’ll see a “Recording Gear” page among the links above. Besides the equipment recommendations, the real value of the page is probably the quick links to other online resources. Please let me know if you find it useful, or have anything to add or subtract!
Nine days ago, Eric Ripma found an Orange-billed Nightingale-Thrush singing on territory in Spearfish Canyon, South Dakota. Assuming the bird is wild and arrived under its own power, it is furnishing a jaw-dropping record — only the third north of the Mexican border, apparently, over 1200 miles farther north than the species has ever been known to venture before. (See Doug Backlund’s photos here.)
Right now I’m in a hotel in Newcastle, Wyoming, on a trip to chase the Nightingale-Thrush, but that’s not why I felt it was blogworthy. Rather, I wanted to call attention to a blog entry by somebody else who saw the bird a few days ago. Cyrus Moqtaderi’s post is mostly about the guilty pleasures of chasing rare birds, but with a passing remark he sent a shiver down my spine:
I made a few rudimentary audio recordings with my camera’s microphone
Cyrus posted some of this audio to his blog; click on the link above and listen to his recording. Considering that it was the audio track of a video made with what he called a “dinky point and shoot camera,” it’s really quite excellent. It’s not going to win any awards from snobby audiophiles, but for the purpose of documenting a sound heard in the field, it’s surprisingly good.
These days, I think it’s safe to say that the majority of birders own a camera capable of taking a short video with an audio track. That is to say, most birders own a camera with a microphone in it.
That bears repeating: most birders own a microphone.
On a weekly basis, people write me asking for my recommendations when it comes to a cheap starting kit for recording bird sounds. Also on a weekly basis, I’ve receive mystery bird sounds sent to me for identification in camera-recorded videos. It took me until now to realize that the second phenomenon might provide a partial answer to the first. Maybe they won’t produce high-definition audio, but if even half of birders’ digital cameras have the power to match what Cyrus’s camera did, then these built-in camera recordings could help to fill a key gap in Joe Birder’s toolbox.
My ability to identify bird sounds mushroomed when I began recording audio. There’s something about listening to a recording that you yourself made in the field that really helps set the mental glue, so to speak. For this purpose, a camera video would work just as well as an expensive parabolic microphone. Granted, it may not be the most efficient use of your memory card, but then memory’s cheap nowadays, isn’t it? At the end of the day, if you’re really interested in audio, then by all means buy a recorder — the Olympus VN-5200PC is hard to beat for the price — but if you’re in the field for other reasons and find yourself in sudden need of an audio capture, remember your camera. It may be good for more than just boring old visuals.
While using just a basic program such as Raven Lite will be sufficient for many recordists, you may find yourself wishing you had a more versatile program for fine-tuning your recordings. If this is the case the one I recommend is Adobe Audition. It isn’t cheap – but it is a fully professional sound-editing tool and will let you do pretty much anything you want with your sounds.
In this post I will take a sound from a raw unedited start to what I consider a finished state. Some of the editing techniques below are the same as what you can do in Raven Lite, while others will be entirely new.
Before I start writing about various ways to manipulate a recording let me stress that the cardinal rule of editing a bird sound is to not alter the target signal itself. The example I use below is a pretty simple bird sound, so it is easy to not mess with the actual song. However in more complex cases you will not be able to use many of these methods quite as thoroughly. Use your best judgment and look carefully at the sonogram before starting any editing procedures.
Disclaimer: to best hear the results of the methods below I recommend using headphones when listening to the examples. You can also see larger images of all the sonograms and pictures below by clicking on them…this will be especially useful to see the finer details of the results of some of the editing.
Step One: Crop
As before, the first step is to crop out the audio you want to edit. Audition has the HUGE advantage of being able to load and edit cuts longer than the one minute limit of Raven Lite, and you don’t have to worry about any of that annoying copying and pasting to get longer clips. In the Waveform Display view, you use the Time Selection Tool to select a portion of the recording that you want to remove, and then go to “Edit”, “Delete Selection”, or simply just hit the “delete” key on your keyboard.
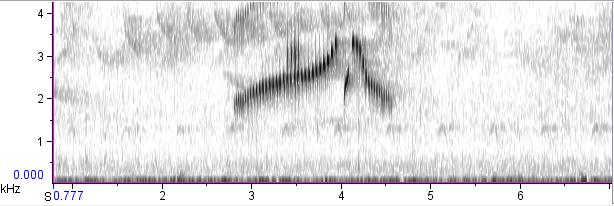
Striolated Puffbird, Cristalino Jungle Lodge, Brazil. This will be the test case for the methods details below; here it is untouched except that I cropped this sample out from the original, and amplified it some to better show the differences that editing will have on it.
Step Two: Filter
This is actually more like three or four steps with Audition. I have gotten in to the habit of removing the low frequency rumble entirely, so I will describe my method for that first, then an alternate method later.
Using the Marquee Selection Tool, select the frequency range you want to remove…for most of my recordings this is from about 350-380 hertz (hz) and lower. Then go to “Edit”, “Delete Selection”. This will remove the frequency range you’ve selected, similar to using the “filter out selection” feature in Raven Lite.
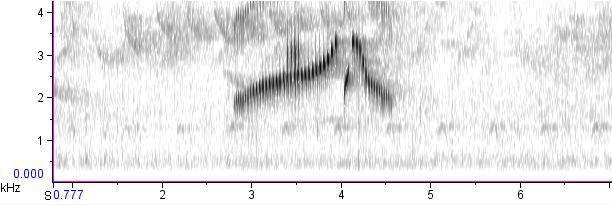
Striolated Puffbird with all frequencies below 350hz removed.
Notice how on this recording there is still a band of louder low frequency noise. This is where what is perhaps Audition’s most useful tool comes in handy. Hit “Ctrl A” on the keyboard to select the entire sound, and go to “Effects”, “Filter and EQ”, “FFT Filter”.
You will see this weird box with a straight line come up. This handy feature allows you to select frequency ranges and amplify or deamplify them as much as you want. For most my recordings I amplify from a minimum amount at 750 or 800hz to around –15dB at 400hz. To place points on the line click at the approximate frequency you want the point to appear. Next right click on the point, and type in the frequency and how much you would like it amplified or deamplified. The beauty of the FFT filter is that you can smoothly deamplify across a range of frequencies, so that no abrupt “line” is apparent. Notice how after applying the filter below the band of low frequency noise is the same strength as the sounds immediately above it.
FFT Filter window. Here the sound is filtered from 750hz in a cline down to 400hz at -15dB.Striolated Puffbird after applying the FFT filter above.
But wait! The FFT filter is useful for far more than just deamplifying a small low frequency noise band. Notice that very noisy and very, very annoying band of insect noise around 3 kilohertz (khz)? Well, let’s kill it! The first step in removing insect noise is to figure out what frequencies it covers. I take the cursor and go first to just below the lower edge of the recording, and then to just above the upper one and write down those frequencies. Then I either figure out the halfway point, or the frequency of the most powerful part of the noise.
FFT filter window showing how to deamplify a frequency band in the middle of a recording, in this case with from a range of 2500 Hz to 3500 Hz, with a midpoint of 3000 Hz deamplified -25dB.
Now, back at the FFT filter window you will have to enter three points onto the graph. The first and third will be your high and low points, with an amplification of zero decibels (0 dB). The second will be the one in the middle or the height of the bug noise. For this one you can experiment with different values until you get the effect you want. Or you can compare the amplitude from the noisy part of the recording to the frequencies you used as the upper and lower bounds, and deamplify by that amount.
Striolated Puffbird with the main band of bug noise deamplified.
As a final step in the filtering process I also deamplified those two smaller bands of bug noise over the first part of the cut. You can deamplify portions of the sound by using the Marquee Selection Tool to select just the areas you want to deamplify, instead of applying the filter to the whole cut.
Remember how I promised to talk about another way to filter that lowest band of low frequency noise? Well, you can also use the FFT filter to deamplify the rumble at the bottom of the spectrum to a lower level, rather than just removing it. I remove it as a matter of personal preference, but many people prefer to leave even the lowest frequencies in their recordings and feel that it gives the cut a more natural sound.
Step Three: Clean-up
Notice all those popping and clicking sounds in this recording? Those are from a combination of handling noise – I was trying to find the bird for some clients I was leading while recording it, and thus moving around a lot – and also noise from said clients moving around. Many recordings have at least some handling noise, and it can range from merely a small annoyance to downright dreadful.
Audition offers a couple of ways to remove handling noise. The one I usually use is to select a small sliver of “clean” sound with the Marquee Selection Tool and paste it over the noisy section I want to replace. I typically try to select a piece of clean sound from close to the noisy part, but sometimes this isn’t possible. In this particular recording, note the nice clean section from 5.8 seconds to 6.6 seconds that could be used as a source of replacement sound.
Once you’ve selected the sound you are going to use to replace the noisy section, click a point on the spectrogram immediately before the part you are going to replace, and use the “mix paste” function to replace it. You can find this under the edit menu, or by using the “Ctrl+shift V” shortcut. Once you have the “mix paste” window up, click on “replace” rather than “mix”, and voila! The noisy sound will be replaced by the quieter one.
Striolated Puffbird with most of the handling noise removed. Note the quiet rustle that overlaps with the first note of the bird song that I did not remove because it overlapped with the target signal (and the harmonics thereof).
Another way to remove annoying clicks and pops is to use the “Spot Healing Brush” – this has comparable results, but I tend to use the method detailed above as a personal preference. Both these ways of removing background clicks and pops could also be used to remove other background noises — I quite often end up having to “mix paste” over some quiet talking in the background, for example. But I pretty much never remove natural background sounds, whether they be other bird species vocalizing, the noise of wings in flight, the sound of the target bird itself moving, etc. Again this comes down to personal preference, but I would rather have the sound be a better representation of the situation the bird was in than a completely sterile cut with nothing but the target species.
Step Four: Amplify
This step can actually be done at any stage in the process. I left it for the end in this discussion, but just as often I amplify right at the beginning, immediately after cropping. I actually amplified this particular recording before any of the steps I detailed above, for ease of illustration in this post.
For amplification it is best to be in the Waveform Display window, since this allows you to see whether or not the sound is clipping from over-amplification.
There are two ways you can amplify the recording. The first is to use the amplification tool, found under the edit menu, on the amplification tab. This amplifies it by a decibel (dB) amount, which I find hard to visualize. You can, however, use the Waveform Display to see how many dB the peak amplitude of the recording is below the max-out point, and then amplify by an amount less than the difference of those two numbers.
The other option is to use the “normalize” feature, also under the edit menu, amplification tab. This allows you to amplify the sound to some percentage of the maximum amplification possible. So, if you normalize to 100% it will amplify the recording to a point just below clipping. 50% will be halfway between no sound and maximum sound, and so forth. With this particular sound I will not amplify it any more than I already have, as the signal to noise ratio isn’t high enough (in my opinion). Many thanks to K. Cowcill for making me aware of this method.
Other Features
I will be the first to admit I barely scratch the surface of what Audition can do. The number of tools that you can use to tweak every aspect of your sound is simply staggering, and if you do some digging you will doubtless find additional ways of editing your sound that I haven’t talked about. One last method of filtering that I will discuss here goes way beyond the techniques I talked about above. It is also rather sketchy if you’re a purist about not touching the actual target signal itself. It is called dehissing, and it allows you to remove or deamplify ALL the background noise of your recording, leaving the target signal clearer.
But dehissing often doesn’t work well on certain types of bird sounds. I’ve found that it works best with clear whistles with little or no modulation; sounds that contain more noise or cover a broader frequency spectrum will be unacceptably altered by this process. I tend to not use dehissing much except in the rare case when I have heavy water or wind noise combined with a clear enough bird vocalization to make for an reasonable result.
Pheasant Cuckoo, Cristalino Jungle Lodge, Brazil. Note the heavy hiss from a nearby river.
Note the heavy background noise in this recording. While it would be possible to edit this cut in such a away that the background noise will be much less apparent by using the more standard techniques I talked about earlier, it would be impossible to be completely rid of a rather unpleasant amount of hissing. So, to filter the recording using the dehiss method, select the whole recording and go to “edit”, “restore”, “hiss reduction”. You’ll immediately notice a large number of options in this window, and I will freely admit that I don’t entirely understand how they all work. I typically set the precision rate at 40, the transition width at 7 dB, the spectral decay rate at 65%, and the hiss reduction amount at a varying number depending on how loud the background noise is. Finally, on the noise floor adjust level on the slider on the left, I use a number between 8 and 11, usually with some experimentation to see what results.
Pheasant Cuckoo with the hiss reduction filter applied.
Note how the hiss reduction filter more uniformly removes background noise than is possible with just the FFT filter.
I chose this sample to illustrate a tiny portion of what Audition is capable of doing…experiment with it some, be sure to save untampered originals, and let me know if you find any other useful features I haven’t talked about here!
Once you’ve come back from the field with a card full of new audio, renamed the files, and backed everything up, you may want to think about editing your sounds. While having untouched originals is useful if you’re doing scientific analyses, editing portions of the sound for posting on the internet, sending to friends, using for quizzes, etc. can make it easier to get your sound out there and heard by others.
Pretty much all the tracks used on commercial CDs of bird sounds have been edited to one degree or another, often quite heavily. Just because the recordings on, say, the Stokes Field Guide To Bird Songs sound like they were recorded in a sound room with no background noise doesn’t mean they were; quite likely most of them were the target of skillful and careful editing to bring out the target species in the recording.
I use two different programs to edit sounds. The first is Raven Lite, available free from the Macaulay Library. Though somewhat limited in its abilities, it does let you do some basic editing that, for many, will be sufficient for their sound editing needs. Detailed below is my normal process for editing recordings in Raven Lite.
Disclaimer: to best hear the results of the methods below I recommend using headphones when listening to the examples. Low frequency sounds are hard to hear over laptop speakers and small external speakers, so if you don’t hear a difference in the examples below that may be the problem.
Step One: Crop
First off I load the original recording. The first step is to select the part of the sound you want to edit…usually for me this involves cutting out any talking I did into the mic at the end of the cut, and sometime some severe handling noise from the beginning. Quite often the loaded sound is longer than the one minute maximum that Raven imposes on files…longer than that and you can’t edit it, and you have to save it in one-minute chunks. There are two ways to deal with this:
select a one minute piece that you want to have as the final edited sound and “save selection as” for your new file that you will edit, OR
copy one minute chunks and paste them into a completely new file, one after the other.
Using the second method you can get up to about three minutes of your recording into an editable file before Raven runs out of memory. Once you get over those amounts you have to create two or more files to edit and then paste them together using another program (I recommend Audacity).
Step Two: Filter
Once I have a manageable section of audio to edit, I filter out low frequency rumble (discussed in the “extra credit” box at the bottom of the Noise page), which is present in all recordings below 300-400 Hz or so. It’s more noticeable if you are recording in noisy conditions, and less noticeable if you are recording a very loud bird and the gain was turned way down.
Filtering out this low frequency band of noise can have varying consequences. If you were recording in a quiet environment it typically makes the target signal easier to hear and the whole recording more pleasant to listen to. However, if you were recording somewhere with increased background noise, such as traffic, it has the effect of making any noise that you didn’t filter out (i.e., the low frequency noise above what you filtered out) sound tinnier and unpleasant. When this is the case, there are several options. First, you can filter out a larger frequency band than normal, but this often results in a “hissy” tone to the whole recording, as in the following example:
Golden-crowned Spadebill, Cristalino Jungle Lodge, Brazil. This recording has been too agressively filtered...note the high-pitched hissy sound of the recording.
On the other extreme, you can actually filter less of the low frequency band than you would normally; quite often the whole recording will sound better with less filtered in such cases than with more. (In an upcoming post I’ll discuss advanced techniques for filtering out low-frequency noise, including frequency replacement.)
To remove the low frequency band in Raven Lite, select the frequency band you want to filter out (vertically), and then expand it horizontally to cover the entire time of the recording. Then go to edit, filter, filter out selection. This method is also useful if there is an especially loud band of insect noise in the recording, a common problem when recording in the tropics. You have to be especially careful to make sure you don’t filter out any of the target signal in these cases, though, since insect sounds are higher frequency and often overlap the bird sound you were recording.
Step Three: Amplify
After filtering, the next step I usually take is amplifying the recording. The amount I amplify is also a bit of a balancing act. When the target signal is quite loud I amplify little or none, whereas when the bird noise is very quiet I tend to amplify more.
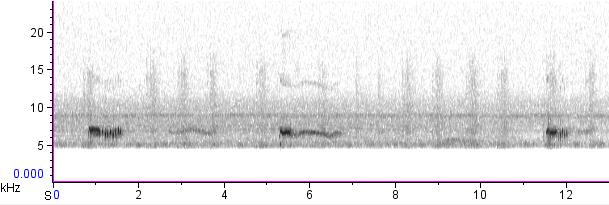
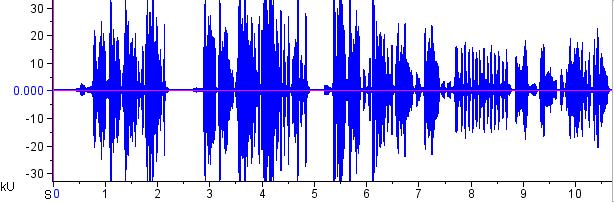
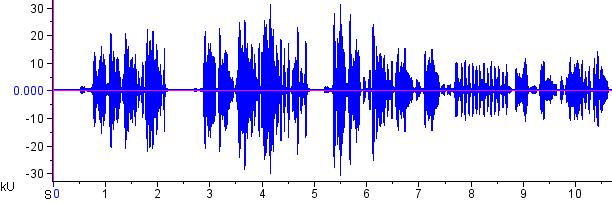
Plain-tailed Wren from Peru, unamplified
The key is not to amplify so much that the recording clips (like in the example below), but to a level approaching that. I tend not to amplify more than four or five times the current levels as this amplifies the background hiss as well, and makes the whole recording sound unpleasant. Experiment a bit with the amplification factor and find the result that sounds best to you.
Plain-tailed Wren from Peru, overamplified. Notice how the sound clips at the top and the bottom, and how the sound is distorted.Plain-tailed Wren from Peru, amplified 1.7 times. Note how the peaks come close to clipping, but don't actually max out.
Note that to deamplify you don’t use negative numbers, but fractions…i.e., a 0.9 multiplier deamplifies to 90% of the original level.
On a side note, amplification is one of the few things for which I like Raven Lite better than Audition. With Raven Lite you can pick a multiple amount to amplify by, whereas in Audition you amplify by dB. I find it easier to visualize how amplifying by a multiple will affect the recording, rather than using a more esoteric measurement like decibels.
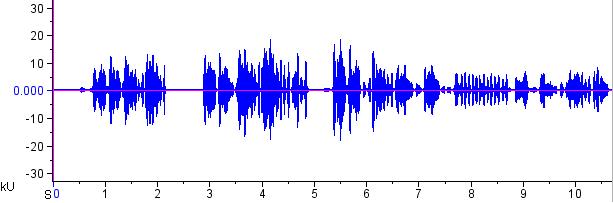
Extra credit: the images above are waveforms, a graph showing sound amplitude versus time. The higher the peaks on the waveform, the louder the sound. An ideal recording will have the highest peaks possible for the target signal without them maxing, and also having the lowest possible amplitude during the non target signal portions of the recording.
Step Four: Clean-up
Typically my final step when editing a sound in Raven Lite is what I call “clean-up” work: removing handling noise, talking in the background, the sounds of walking, car horns, etc. Note: I personally far prefer Audition over Raven Lite for this step, but back before I started using Audition, here is what I used to do.
Since in Raven Lite you can only cut and paste timed pieces of the recording covering the entire frequency range, you have to replace the whole time span of the sound that contains the unwanted noise. To maintain natural intervals between the bird sounds themselves, I select a piece of sound with no extraneous noise that is the same length of time and paste over the section with the unwanted noise.
At the very end I will often paste a little bit of empty sound at the beginning of the cut to give a bit of lead time until the first vocalization, and sometimes a bit at the end to make the whole recording more “symmetrical”.
Andrew Spencer recording a Gould's Toucanet, Cristalino Lodge, Brazil, September 2009. Click to hear the recording.Andrew's current recording rig: a 22-inch Telinga parabola with a Sennheiser ME62 microphone and a Fostex FR2-LE digital recorder. Note the duct tape, sweat stains, etc.
I’ve been bugging my old buddy Andrew Spencer to send me a recordist profile for months now, but until this week he was too busy slogging around South America. Now he’s on a stateside break until July, when he’s headed back to the Bird Continent to take up residence as a professional birding tour guide.
Ten years ago Andrew and I used to take off on birding trips all weekend every weekend, not to mention most days after school. After I caught the recording bug, it wasn’t too long before Andrew caught it too. Now, he’s the top contributor to Xeno-Canto, with 2500+ of his recordings online.
I’m pleased to say that I’ve added Andrew as an Earbirding author, so you’ll be seeing occasional posts by him on this site from now on. I figured it was a good idea to introduce him to his audience before handing him a keyboard — hence this author profile.
Here’s what Andrew has to say about himself and his recording.
I started watching birds when I was about five, but didn’t start recording until after my first trip to South America, to Ecuador in 2006. While there I realized that the ability to record birds in the tropic was absolutely fundamental to fully enjoying South American birding, and as soon as I got back I bought my first recording rig.
In the few years since then I have become ever more deeply obsessed with recording…what at first was something to help call unknown birds in and document unknown sounds for later identification became a quest to record as many species, song, and call types as I could. As a result I have traveled around much of the US and South America recording birds.
Since I started recording I have used a number of different recording rigs, in the following chronological order:
Sony HD mini-disc with a Sennheiser me66 shotgun mic
This was my first rig, and a basic yet ultra portable setup. The minidisk recorder did a decent job in terms of recording the sound, but had several serious drawbacks, chiefly the lack of ability to manually adjust the gain. [listen to a Yellow Rail Andrew recorded with this rig]
Oade modified Marantz PMD660
I used this recorder with both my shotgun mic and with a Telinga Parabola I later purchased. Of all the recorders I’ve used this was by far my favorite; it had remarkably clean and powerful preamps, approaching those of high-end recorders. It did have some durability problems, and repeated exposure to high humidity in the tropics caused problems with the output lines. [listen to a Tepui Wren recorded with Marantz & shotgun, and a Golden-cheeked Warbler recorded with Marantz & parabola ]
Fostex FR2-LE
My current recorder, I got this on short notice to replace the malfunctioning Marantz. As a whole it does a decent job, but the preamps are noticeably noisier and less powerful that the Marantz, and the rig as a whole is less durable in my opinion. I mostly use a Telinga Parabola and a Sennheiser me62 omnidirectional microphone with the Fostex, which produces acceptable but usually not stellar results. [listen to a Peruvian Plantcutter recorded with Fostex & parabola]
I use a couple of different recording styles while in the field, depending on where I am and who I am with. In North America I usually have a small list of targets that I want to record, and if I find a vocalizing bird I stick with it for a long time trying to get different sounds out of it. Other times, especially if I am on a trip to an area I don’t go to much or with non-recordists I will record a bird making noise but move on fairly quickly to the next species.
I tend not to use headphones while recording, even with the parabola. While using headphones does allow one to pinpoint a singing species with more precision I find that it also makes it harder to hear other birds singing around you, and the process of putting on an removing the headphones both eats up time and is really quite annoying. With practice I feel it is possible to pinpoint a target with a fair degree of accuracy and by watching the meters on the recorder. Since I don’t use headphones I also rarely use the wind coat for that parabola, since this allows me to look through the clear dish and at the bird, if it is visible, and pinpoint it without having headphones.
Unlike some recordists I am a big believer in post recording editing. Typically I will filter out low frequency rumble if it doesn’t overlap the target signal, amplify the recording if it is very quiet, and if necessary remove background talking and handling noise. For editing sounds I recommend Raven Lite, available free from the Macaulay Library, and for more advanced editing Adobe Audition.
I know I said I’d be gone for a couple more weeks, but that was before I got this great guest post by Mel Goff reviewing the SongFinder by Nature Sound Electronics, a device intended to help birders with high-frequency hearing loss. As I suffer a little bit from that malady already (and will likely suffer much more in years to come), this is a topic of great interest to me, and I hope others will benefit from Mel’s review.
One thing Mel wanted me to mention was that he has no vested interest in the product or the company; he just thinks this information needs to get out. With that, I’ll turn it over to him (and sign off again until March, as planned):
SongFinder Review
by Mel Goff
Background
I am 64 years old and have high frequency hearing loss. I spent 21 years in the US Army and the noise levels from computers, heavy equipment and weapons did me no favors. I have been birding with my wife, Jeanne, since a trip we took to the Everglades National Park in 2002. We make quite a team as she can hear the birds and I can do a pretty good job of spotting them. I tried all the latest and greatest hearing aids, and while they amplified the sounds that were within my frequency range, they did nothing to let me hear the sounds from the higher frequencies where the majority of birdies tweet. I could never justify the cost of those hearing aids when they did not do the one thing I wanted from them.
Then I saw an ad in the ABA’s “Birding” magazine for a product called SongFinder. It alluded to its ability to digitally convert high frequency sounds to lower frequencies thus enabling people like me to once again hear the birds.
Let’s Check It Out
With some optimism and much skepticism, Jeanne and I went into the home office and opened the Nature Sound Electronics webpage at www.nselec.com. I went from page to page reading about the frequency shifting technology, the testimonials, and the ordering information, until I finally came to the “Sound Samples” link. On this page there are pictures of 16 birds that I had long ago decided were mute. After all, I could hear a crow, so why couldn’t I hear a Yellow Warbler? I clicked first on that YW and a voice said “Yellow Warbler” followed by silence. Jeanne said, “Yep, that’s the Yellow Warbler.” Then the voice said “Divide by two”. Oh, my gosh, I heard it! It’s a trick! It cannot be!
We listened to all 16 with the song divided by 2, 3, and 4. Jeanne assured me that the “divide by 2” option was by far the closest to the real song. The others had the same pattern and cadence, but the lower pitch came off as less than satisfactory.
Let’s Give It a Tryout
The SongFinder. Photo by Mel Goff.
Seeing that there was a 14-day refund policy, I decided to give the SongFinder a tryout. The only problem was that this was Monday, and we were leaving for Hawaii on Saturday. I called the company and I agreed to pay for FedEx second-day delivery. I got the unit on Friday afternoon, just 12 hours before we had to head for the airport.
On the plane I read the manual, then re-read the manual, then read it one more time. When we arrived in Lihue, Kauai, we had to get a rental car, buy groceries, drive to the resort, check-in, unpack – well, you get the picture. By now it was dark and the birds had retired for the evening.
The Big Day
Sunday morning, just after sunrise. We are dressed, we have our binocs and guides, and we head out to test the SongFinder for the first time.
White-rumped Shama, University of Hawai'i at Manoa. Photo by K.W. Bridges.
At this point I want to tell you that the online demo did nothing to prepare me for the symphony of sound I would hear when we stepped into the resort parking lot. Cardinals (Northern and Red-crested), Japanese White-eyes, White-rumped Shamas, House Sparrows, House Finches, and Common Mynas all performed just for me. I could not believe what I was hearing! In fact, I decided to turn off the switch to see what would happen. When I did, all I could hear were the Zebra Doves, Spotted Doves, and Junglefowl that I had heard on our last visit to Kauai.
I am not ashamed to say that when I turned the power back on, I shed a tear or two as the concerto of songbirds once again came through the headphones. I was now finally a BIRDER, not just a Bird Watcher. For the next 16 days on Kauai, Maui, and Oahu, I heard the calls and songs of 76 species – seven of them lifers for Jeanne and me. The endemics: I’iwi, Apapane, Amakihi, and Maui Creeper at Hosmer Grove. The Japanese Bush-warbler on Lower Koke’e Road. The Bulbuls and Shamas at Lyon Arboretum. I cannot begin to describe the feelings I had.
The Good
The unit is easy to set up and use. It is lightweight, and clips to my belt. The size of the unit (4″ by 8″) did not bother me in the least. Adjustments for volume and frequency were easy to make. I used just the first 4 AA batteries I installed for the full 16 days and did not have to replace them even though I did have backups with me.
The SongFinder does not change any of the sounds I can already hear. I still hear the doves and crows and jays and flickers just as I did before. Their songs and calls do not come through the headset and are not altered. That is an important fact, because directionality will be mentioned in the next section and SongFinder does not affect that for the birds I just mentioned.
Herb at Nature Sound Electronics worked with me to get the unit delivered before I left, and even told me that if I had a problem with the unit, he would not be too strict on the 14 day policy since I told him our plans in advance.
The Bad
In actuality, there is no “Bad”, but there are a couple of things I should mention. Directionality is not a strength of SongFinder. It lets me hear the birds, but it is not Full Surround Sound Stereo that would let me pinpoint birds. Jeanne still helps me with that. Also, birds that are far away still sound far away. The unit is a frequency converter, not an amplifier.
I wear a large hat, size 7 & 7/8. The SongFinder headset is not adjustable like music headsets, so the one-size-fits-all idea is actually one-size-fits-most. It takes getting used to, but is something I gladly will adjust to. I plan to try to find a way to adjust the headset or see if the company has a larger model.
The cost may put off some folks. At $750 plus $15 shipping, you may think it is too expensive. But let me tell you that it is a small price to pay for the benefits you will receive. Digital hearing aids that will do nothing to let you hear the birds can cost five times as much.
Conclusion
SongFinder has changed my birding life. I can’t wait to get out in the mornings to hear the sounds of the winter birds. The chickadees, juncos, sparrows, finches, and Downies are beautiful to see, but even more beautiful when you can also hear them. I cannot speak to long-term reliability, but first results have been overwhelmingly positive. I wholeheartedly recommend SongFinder to any birder with high frequency hearing loss.
Bob Zilly, 1/25/2009.Bob's two recorders. Left: Olympus LS-10 Linear PCM Recorder; right: Olympus VN-5200PC Digital Voice Recorder.
Bob Zilly of Longmont, Colorado describes himself as a “casual and opportunistic” recordist. I’m excited to profile Bob in this first post of 2010 not only because he’s a terrifically nice guy, but also because I think his recording style and equipment will appeal to many readers who might like to get into audio recording in a relatively quick, easy, and inexpensive way.
Bob uses the simplest kind of digital recording device: handheld voice recorders. No external microphone, no headphones, no cords or cables to worry about (unless you want them). At right you can see his two rigs:
Olympus VN-5200PC Digital Voice Recorder (right). This thing retails for well under $100. It records only in a compressed format (WMA), which won’t do for some audio purists, but it really doesn’t distort bird sounds either, as far as I can tell. For someone who just wanted to dabble in recording — say, brushing up on the local songs, documenting the occasional rarity, maybe even determining a crossbill type from time to time — this model would be ideal.
Olympus LS-10 Linear PCM Recorder (left). For a couple hundred dollars more, this machine allows higher-quality recording, eliminating the compression that MP3 and similar formats introduce. Both this and the above recorder can be operated with an external shotgun microphone if desired.
Here’s what Bob had to say about why he records, and how he likes his equipment:
Several years ago I bought a digital voice recorder to replace pen and paper for keeping lists. I found that while playing back the recordings I could sometimes hear the bird I was talking about. After that I would sometimes record the sounds of birds that I didn’t know in order to help identify them.
Mind you, voice recorders certainly have limitations. The microphone’s pickup pattern is less than desirable and I often hear airplanes, insects, and handling sounds on my recordings. I sometimes yearn for a shotgun or parabolic mic to pick up faint sounds and exclude background noise — but then again my equipment fits in my shirt pocket and I can be recording in the time it takes to pull it out of my pocket and press a button. I don’t usually go out specifically to record bird sounds but since the recorder is always in my pocket I can record whenever an opportunity presents itself.
I also recently bought a true high-fidelity pcm recorder (the Olympus LS-10) but I’m still just using the built in microphones and have just started playing around with it. Jury is still out on whether I like it. I tried setting record levels manually on some quiet sounds and this led to lots of amplifier noise because I had to crank the levels up a lot to see anything on the VU meters. Later I tried using the auto record level function but then the quiet sounds were barely audible. I think my voice recorder did a better job. I’ll play with it some more but I may have to think about getting a shotgun mic and possibly an external preamp too so I can use line in.
It’s true, of course, that the single most important piece of equipment in a recording rig is the microphone, and these handheld recorders don’t have the best built-in microphones; they’re designed for a human voice at a distance of a couple of feet, not a Song Sparrow 80 meters away. But for those who simply want basic recording capabilities when the opportunity arises, these things can work pretty well, as this recording by Bob shows. I’ll let him introduce it:
I was visiting my mom in Illinois and woke up at 4:00 AM and heard this guy. I just opened the window and grabbed the voice recorder. The hum is from the building next door, not the recorder. Because of the hum and the bugs its not the best recording but rather an example of how opportunistic you can be with simple equipment.
Not too shabby! Here’s hoping that Northern Cardinal helps inspire others to follow Bob’s lead and get into recording, even if it’s just the casual kind!
The second installment in our occasional profile series spotlights Tayler Brooks of Brier, Washington, a newly active young recordist who was one of the expert sound ID panelists at the recent Western Field Ornithologists conference in Boise. Tayler grew up in western Washington and became interested in birds at the age of 12. For the past three years, bird sounds have been her favorite bird-related area of study. She has just started her second year in college, studying biology; she is very involved with various projects of the Puget Sound Bird Observatory and is a volunteer for her local Audubon chapter.
Here’s the equipment that Tayler uses:
recorder: Marantz PMD660 modified by Oade Brothers Audio to have quieter and more powerful preamps. In Tayler’s words, “I like it quite a bit actually, it does everything I want it to really well, I think. I feel like it’s a major improvement on the minidisc in most aspects, except most notably battery life (it goes through batteries like there’s no tomorrow).”
microphone: Sennheiser ME67 shotgun microphone with K6 (AA battery) power supply (thus, the same microphone that Paul Hurtado uses)
shockmount & windscreen: Rycote Softie
no headphones. “I feel I can better pinpoint and position the mic to be on target with the sound source using my unaided ear since my mic is less directional than a parabolic mic setup.”
Tayler had this to say about how she uses her equipment, and why:
With my growing interest in better understanding bird sounds, I now almost always take my recording equipment into the field with me whenever I’ll have a decent change at being around birds that are making noise. Like binoculars, it has become one of those things that feels strange to leave the house without when I’m bound for places in nature. One thing I’m always looking for when I record is capturing variation be it within species or populations, so I can be more familiar with the lesser known sounds of even common species. That in particular opened up a new world of discovery for me when I really started to take a closer look at the more complete set of sound a given bird species makes. Also, recording vocalizations from species groups not well represented, such as many types of waterbirds (gulls, ducks, and non-breeding calls of shorebirds) I also find exciting.
I asked her if she had any tips for beginners, and she responded:
Go recording solo or with small groups of people. This may seem obvious, but I thought I’d mention it since I often go out in search of birds with a group of five or so. The smaller the group (in many cases), the more you’ll be able to hear, and making cleaner recordings that require less editing is all the more easy.
Also, give recording in mono a try. It’ll save you a lot of memory space.
In response to my last post, Paul Hurtado suggested that I periodically profile recordists and their equipment, as a service to beginners and those shopping for new gear. I loved the idea, and since it was his (and he volunteered), I’m starting with a profile of Paul himself.
Paul Hurtado in the Adirondacks.
According to the bio he sent me, Paul grew up roaming the wild lands around Pueblo, Colorado in search of all things spineless, scaly, slimy or feathered. Since graduating from the University of Southern Colorado, he has been working on his Ph.D. in Applied Mathematics at Cornell University, using mathematical models to study the ecology of infectious diseases.
Here’s the run-down on Paul’s recording gear:
Microphone: Sennheiser ME67 shotgun microphone with K6 (AA battery) power supply (purchased on eBay for around $250-$300)
Shockmount & windscreen: homemade. The shockmount for the microphone is fashioned out of PVC pipe, flat aluminum stock, screws and wingnuts from the hardware store, plus shock cord from an outdoor store. The windscreen consists of men’s dress socks. (Editor’s note: homemade shockmounts are really cool and I’d like to talk more about them in a future post.)
Recorder: Sony Hi-MD minidisc recorder, model MZ-RH910, with the external AA battery pack
Cable: 3-pin XLR-to-stereo mini cable to connect the mic to the recorder
Headphones: regular walkman-style
And here is said gear posing for a photo, with the dress-sock windscreen pulled partly off so you can see the microphone and the skeleton of the shockmount:
Paul says:
I originally wanted to get a recording setup to record rarities or interesting breeders (e.g. out of range Chihuahuan Ravens, empids, etc.), but I more often find myself doing other things instead. So far, I use it mostly for personal enjoyment of some of the more common local species and the occasional vocal migrants. It’s a great way to get out and spend time just observing a few individuals for a relatively long period of time. Nest vocalizations, territorial disputes, all these things are amplified enough to reveal a lot of cool behavior you just can’t experience under most circumstances.
I do occasionally chase “target species” I’d like to record (e.g. winter finches are always a treat here in western New York), as well as night-flight calls during migration (although a nice Bill-Evans-style parabolic mic would work way better than a shotgun mic). I’ve used my recording setup to “turn up the volume” for a friend of mine who is somewhat hearing impaired over some frequency ranges, and I even brought it along on a two week field course I helped teach a couple of winters ago down in the Carribean. While recording conditions were horrible during the course, I did get a few “ok” recordings of species that were the subject of student field projects, which they were then able to use in their presentations at the end of the course.
Listen to the sounds of a Vervain Hummingbird (Mellisuga minima) that Paul recorded in Punta Caña, Dominican Republic, in January 2008. The recording is faithful to both the bird and its slightly noisy surroundings:
And here’s another nice recording of Paul’s, of a Hammond’s Flycatcher (Empidonax hammondii) in Pueblo Mountain Park, Pueblo County, Colorado, on 31 May 2006:
You can contact Paul through his website if you have any questions for him about recording!