Canyon Wren, Irish Canyon, Moffat County, Colorado. Photo by Andrew Spencer
It’s a commonly held conception that only male birds sing. And for many birds in North America that is indeed the case. However, there are cases of female birds that sing as well – finches, orioles, cardinals, and some warblers (occasionally), among others. In North American wrens, for the most part, only the males sing, but exceptions include House Wren, Cactus Wren, AND Canyon Wren.
This is in sharp contrast to tropical wrens, who have among the best female singers in the entire avian world. Indeed, the duets of some of the South American wrens are probably some of the all time great bird sounds on the planet! Take a listen to these two different subspecies of Plain-tailed Wren: XC42098 and XC58882.
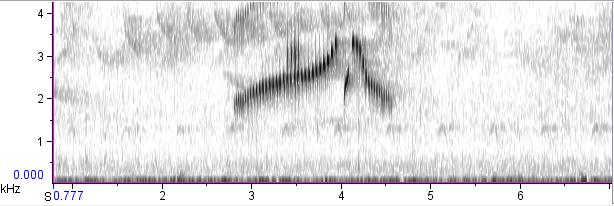
Back up here in North America, the song of male Canyon Wren is among the best known (and most beautiful) of the sounds in the west, echoing off canyon walls just about anywhere with appropriate habitat – take a listen below.
But Birds of North America gives an interesting tidbit if you dig a bit further: “Both sexes sing, but female song is rarer and usually shorter.” It goes on to describe a couple of female vocalizations, but without spectrograms and without a whole lot of detail. So it is up to the observer to figure out what female song is when in the field. A while back Nathan told me about this vocalization, and gave me a recording he made in Arizona that he thought was the female song, asking me to keep an ear out for it and to try to get a better recording. I was intrigued – there’s little I love more than a bird sound mystery – so I edited the recording for playback and put it onto my i-pod (you can also hear another example at 46 seconds on LNS#21482).
A few weeks later I had my first chance. I was in Irish Canyon in far northwestern Colorado, and I heard the liquid notes of a Canyon Wren song on a nearby cliff. I walked over, and played the tape in the middle of the bird singing. I was a bit startled at what happened next – the singing bird stopped, mid-strophe, and flew right in at me, calling loudly and angrily. It was also giving an unusual call type (see below), and continued giving it for some time, from the middle of pinyon pine trees and on the ground. Eventually it flew up to the top of a tree and started singing again, but still reacted the same way the next time I played Nathan’s recording. What it did not do, nor did any other bird in the area do, was sing the “female” song that I had on my i-pod.
I took this as something of a challenge. That morning I played to three more singing Canyon Wrens. All reacted to the track, though none as strongly as the first bird, but none responded with the same vocalization as the one on the tape.
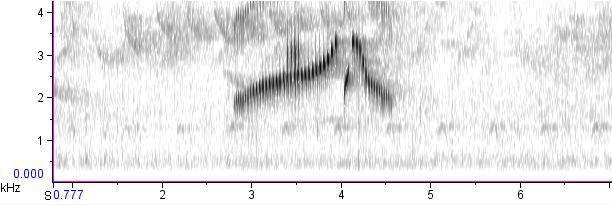
Finally, about a week later, I hit pay dirt. This time I was down near the town of Dinosaur, and I randomly played Nathan’s cut just to see what would happen. I didn’t hear a response, and after waiting a couple of minutes I began to walk away. Then there it was! High up on the cliff was a perfect carbon copy of what I had just played. I got a witness recording, and began to move in. I was soon watching the bird as it sang from on top of prominent rocks, and after another quick playback, on some nearby tall shrubs. To hear for yourself what it sounds like, take a listen to the cut below:
When I played the recording I had gotten to the bird in question it would react immediately and aggressively, flying in very close and giving the same vocalization back. Interestingly, when I played back the normal song, it would barely react, at most just sitting up and looking around briefly. Frustratingly, I was unable to ever confirm two birds at once, so I can’t say for sure that this is from a female bird. However, about half an hour later there was a bird in the same territory singing the normal song, and when I played back the “female” song to that individual it didn’t react much at all, and the one time it did it came in low giving the same calls as the bird from Irish Canyon. When I played the normal song back to it, though, it went ballistic, flying right in and singing at close range.
I also took photos of both birds, and examining these later I could see what I believe are differences between the two. SO there seems to be a preponderance of evidence for there being two birds in the same territory. And since one of those birds was singing normal song and acting in a territorial manner (and is thus, presumably, a male), it would stand to reason that the bird I recorded singing “female” song was, in fact a female. But I can’t be certain, so I guess I’ll have to keep trying!
Warbling Vireo, Illinois, 8/18/2010 by Ken Schneider (CC 3.0)
Warbling Vireo is among the many widespread North American species with east/west vocal forms that meet on the Great Plains. Along with other examples of this type of song diversity (Marsh Wren, Blue-gray Gnatcatcher), eastern (gilvus group) and western (swainsonii group) Warbling Vireos may represent two species, and if they are ever split, song would be the best way to identify them.
Look at a range map of Warbling Vireo and you’ll see that it continues in a pretty much unbroken swathe across North America. The eastern and western song types meet at the Great Plains/Rocky Mountains interface, and in at least some of those both occur in a fairly close proximity but remain identifiable to type. For example, Warbling Vireos singing on the eastern plains of Colorado not far from the foothills are typically of the eastern type, while those from the foothills west are of the western type. In the Black Hills of South Dakota eastern types occur in the lower elevations, and are replaced by westerns in the higher ones (Birds of South Dakota). What is not very well studied, however, is whether there is a cline in song types anywhere in their range, and how the birds react to each others’ song types in areas in/near potential overlap.
Warbling Vireo range map by Nathan Pieplow
The plumage of the two forms is extremely similar. Western is often cited as having a darker crown and more defined eyeline, giving it less of the “blank-eyed” look associated with Warbling Vireo. It is also a bit whiter on the underparts and darker on the back, and the bill is slightly thicker (Birds of North America). However, these differences are very subtle, not well studied, and hard to see in the field. A much more reliable way to separate the types is by their primary song, which has consistent (if not always obvious) difference. I’ll first talk about the eastern song type, which many readers should be familiar with it, and then contrast the western form.
Eastern:
The song of the eastern Warbling Vireos is what gave the bird its name. It is a pleasant caroling song that rolls along, often ending in an emphatic higher note, transcribed at times as “if I could see it I would seize it and squeeze it til it squirts” or some variation thereof. The song phrases are typically around 2.5 to 3.5s long, and are made up of a series rich whistles that are slightly modulated. In the song of eastern Warbling Vireo, most of the initial notes are near the same pitch, with a few higher notes thrown in towards the end of the song. Below are a couple of examples of eastern song:
Western:
Western Warbling Vireo songs differ from that of eastern mostly in terms of pitch. Most western songs tend to have more high pitched notes, and these are placed more evenly throughout the song, breaking up the rhythm so that the whole strophe sounds less sing-songy than the song of Eastern. While the song of eastern gives the impression of a series of low, caroling notes, the song of western gives a jumbled and less structured feel, with an overall higher pitch. This difference in sound takes a little bit of practice to pick out, and there are some birds (especially in the contact zone?) that are harder to place as one or the other. A couple of samples of the western song type:
Where from here?
Despite the fact that the songs of these two types of Warbling Vireo are fairly well differentiated, very little is known about what goes on in the contact zones. This is where just about any birder visiting the western Great Plains and eastern Rocky Mountains can make a difference. Pay attention to the Warbling Vireos! Are they eastern, western, undefinable? There are very few recordings available from these areas, so anything you find will be interesting and useful.
White-crowned Manakin, eastern Venezuela, copyright Nick Athanas (www.antpitta.com)
The neotropics are blessed with many families of birds that you can’t see in your neighborhood park up north. But perhaps none of these are more interesting, from an acoustical perspective, than manakins. They defy expectations when it comes to making sounds: some of them rub modified feathers together like a cricket, while others beat at the air, snap their wings against their body, or engage in elaborate, ritualized displays involving multiple birds making a smorgasbord of weird mechanical sounds. And some of them just sit there all day on one perch and say “nicky-the-greek” over and over and over again.
Being suboscines, manakins are thought to not learn their songs , instead having them hard-wired into their DNA. And as with other suboscines, this has important implications for their taxonomy when major differences between populations occur. In at least one manakin clade (White-ruffed and White-bibbed Manakins), differences in vocalizations and displays played a role in considering them separate species.
When it comes to sounds, the White-crowned Manakin (Pipra pipra) isn’t the most interesting of the family. Its displays are mundane compared to those of, say, Long-tailed Manakin. And the mechanical sounds it makes are limited and mostly simple. But it does appear to have a plethora of distinct vocal types that may well correspond to different species, despite the fact that they all look nearly or completely identical to each other in plumage.
A recent trip to the remote Cordillera del Condor in far southeastern Ecuador piqued my interest in this vocal variety when I heard a new vocal type, one I hadn’t even known existed until the day before. That brought the total vocal types that I knew of up to three, each replacing the other in very close proximity in a complex system of allopatry that is unlike any other species group in Ecuador. I was interested to see how many there really were if I listened to recordings from throughout their range. What I found shows that there are more to learn about manakins than just how they make their weird noises (which is what most recent manakin research has focused on)…complex taxonomical puzzles also remain to sweeten the pot. I’ve written a feature on xeno-canto detailing what I’ve found – take a look!
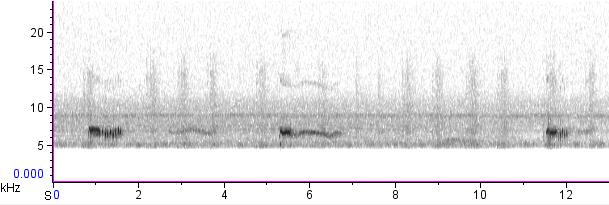
Blackpoll Warblers have among the highest pitched of all bird songs in North America. Most anyone who lives in the east (and can still hear it) should hear the loud “see-see-see-see-see…” of a Blackpoll at some point during spring migration. Listen to enough of them and you will doubtless notice a great deal of variation in the speed and particular note characteristic of the song.
However, there isn’t a whole lot of specific information in the field guides on the variability of Blackpoll Warbler songs. BNA does says of the speed: “Rate varies from 5 to 12 notes/s (Dunn and Garrett 1997), and frequency averages 8,900 hz (range 8,050–10,225 hz; Brand 1938; Fig. 3)” But it also says “No information on geographic variation”, and there is little other information on variation in Blackpoll Warbler song.
On my first trip to northern Coos County, New Hampshire (in 2008), I heard a very high pitched, very fast trill that I did not recognize. Upon tracking it down I was rather surprised to see it was a singing Blackpoll Warbler. I kept an ear out the rest of that day and found a half dozen or so Blackpoll Warblers, all singing that song. When I counted up how many notes per second the song contained I found that it was 19, well over the top end of the range mentioned in BNA. Upon mentioning this weird song type to a friend of mine from New Hampshire (Ben Griffith) he said that birders in the state were aware of this local dialect, and that all the birds up around Pittsburg, NH, sang like this, and none of the birds elsewhere in the state did.
This rather piqued my interest, so I’ve been keeping an ear out for singing Blackpolls ever since.
From what I’ve been able to find, my friend in NH is right about the very limited range of the super-fast song type. A few miles to the south, and even closer to the east, birds sing more normally paced songs (from Jefferson Notch, NH, and Saddleback Mt., ME, respectively). I have also heard many migrant Blackpolls at a number of locations from Ohio to Maine, and none of them sang fast songs like the NH birds.
Interestingly, a migrant bird recorded in E MA by Ian Davies (recording below) has a fast pitched song like the Coos birds. While it’s impossible to say for sure that this bird is from the Northern NH population, I would bet money that it is – E MA is directly south of these birds.
So if any of you hear Blackpoll Warblers regularly, or are heading to where you might, keep an ear out and let me know how fast they are singing…I’d be interested to know!
Streaked Tuftedcheek. Photo by Luke Seitz from Pichincha, Ecuador, used with permission.
Anyone who has birded much in South America will be familiar with what I like to call “field guide taxonomy”. Many authors of South American field guides often make taxonomic decisions not yet accepted by “official” checklists such as the SACC, Clements, or the IOC. Often these are splits and lumps that are obvious and will doubtless be supported with future research, but just as often they are made with very little information justifying the split.
One such split is that of Buffy Tuftedcheek in Ridgley & Greenfield’s Birds of Ecuador. They support their split soley on range and plumage, and don’t even mention vocalizations: “P. johnsoni (Pacific Tuftedcheek) of western Colombia and western Ecuador is regarded as a monotypic species separate from P. lawrencii (Buffy Tuftedcheek) of Costa Rica and western Panama, based on its very different distribution and distinct plumage differences.”
Recently, on a trip to Costa Rica, I was able to record the song of nominate Buffy Tuftedcheek. Since I had been unable to find any cuts of this vocalization prior to my trip, I was completely unprepared for how different it sounded from Pacific Tuftedcheek (which I am very familiar with from living in Ecuador). I’ve posted a few cuts I got in Costa Rica on xeno-canto, and written a feature comparing them with both Pacific and Streaked Tuftedcheek (which some people consider conspecific with Buffy Tuftedcheek, and which sounds far more like nominate Buffy than either one sounds like Pacific).
During the course of my research, I also stumbled upon some interesting variation in the songs of the widespread Streaked Tuftedcheek. Unfortunately there are far too few samples to get a handle on this variation, but I’m just itching to get my hands on some more cuts to see what is really going on… You can read all about it here.
Finally, if any of you have ANY recordings of any tuftedcheeks, I would encourage you to upload them…sample sizes are depressingly small at the moment.
Band-winged Nightjar (subspecies decussatus), Rafan, Lambayeque, Peru. January 2010, copyright Christian Nunes
I’ll admit I was crushed when Nathan wrote a feature for xeno-canto before I did. I have no one to blame but myself; it was pure laziness on my part that kept me from doing one. After I got over the bruised ego from him being first I got my act in gear and wrote one of my own. So if you want to read about the vocal variation in Band-winged Nightjars, check out my first xeno-canto feature.
Like Flycatchers and other suboscine passerines, Nightjars don’t learn their voices. So distinct vocal variations may well have taxonomic implications. In Band-winged Nightjar in particular there seems to be a good case for further study, and potentially splitting the species. For example, note how the differences in Whip-poor-will vocalizations recently played a role in the split of that species.
Finally, if any of you have recordings of Band-winged Nightjars you could upload to XC, especially of the decussatus, roraimae, or patagonicus subspecies that would be of great help!
Copyright Andrew Spencer, April 2010, Boot Cove, Maine
Or so I’ve been told. Supposedly the only way that Spruce Grouse can get away with being so remarkably “stupid” is the fact that since they eat spruce needles they taste absolutely vile, vaguely reminiscent of turpentine. Since, obviously, I haven’t actually tried Spruce Grouse myself I can’t comment on what they actually taste like, but it certainly sounds like as good an explanation as any… However, despite their not tasting very good this is still a highly sought-after species, with a well developed reputation as a hard to find bird. Here is my take on how you can find one…
Depending on who you ask, how to actually find a Spruce Grouse is a matter of debate. Some people say it’s easiest in the winter, when deep snow forces birds to the edge of the road. Others may say it’s in the later summer, when females herd their young through the spruce-fir. If you ask me, though, I would say that it’s in the early spring, when the muffled wingbeats of displaying males echo softly through the forest.
First off, though, I should correct a common misconception about Spruce Grouse displays. They do NOT include extremely low pitched hooting, as has been reported in many sources (e.g., Sibley). This misconception apparently has its roots in and article by Greenwalt (1968), and this error has been echoed through many field guides until recently. The displays of Spruce Grouse (the males at least) are entirely non-vocal, and the low pitched vocalizations referred to in most sources apparently are in reference to Dusky or Sooty Grouse.
I should also note that all the displays I write about below are in reference to the nominate subspecies of Spruce Grouse. The taxon found in the northwestern part of the lower 48 and adjacent Canada (“Franklin’s” Grouse) has a different display, and one I am not familiar with.
The main display of male Spruce Grouse (and the loudest, and thus easiest to hear from a distance) is simply the sounds of the wings whirring as it flies from a perch about 15 feet in a tree to the ground, and then back up to the tree. The specifics of the wing noise varies, though, between the descent and the ascent: during descent the bird flies normally, until it nears the ground, when it suddenly rears up nearly vertically in the air and the pace of the wingbeats picks up noticeably. During the ascent the wingbeats are more powerful and faster, but even in pitch throughout the flight.
While neither of these wing noises are especially loud, in the early spring boreal woodland (where there tends to be very little noise) it can carry for quite a distance and be a good way to find them.
Spruce Grouse flight display descent, Boot Cove, Maine, April 2010Spruce Grouse flight display ascent, Boot Cove, Maine, April 2010
Once you’ve located the displaying grouse, if you watch it long enough you may well notice some other, quieter and more subtle displays. One that was frequently given by a bird I observed for a couple of hours in Maine consisted of the bird lifting both its wings about a quarter way to horizontal and then beating them against the sides of its body, producing a muffled but quite audible “thump”. This sound is apparently not described in BNA, but seems to be a quieter version of the two loud “gunshot-like” thumps of the display of “Franklin’s” Sprcue Grouse.
Spruce Grouse wing thump, Boot Cove, Maine, April 2010
The other display that I observed from Spruce Grouse in Maine is what BNA calls the “tail-whoosh”, where the bird opens its tail and closes it rapidly, producing a slightly metallic swishing noise. It is also surprisingly loud for a sound being given by just the tail of an otherwise stationary bird. Compared to the flight displays and wing thumps, the tail-whoosh is a rarely given noise, at least during my observations – I heard perhaps a half-dozen total during two hours.
Spruce Grouse tail-whoosh, Boot Cove, Maine, April 2010
The title of this blog post is a little misleading – while both websites have warbler themed names, the real purpose of this blog is to announce two new nature sound resources. The first website I’m announcing today is Dendroica, a new identification resource for North American birds. Originally released back in 2007 on CD, it has just come to the web. Under their acknowledgments they state their main purpose as an “interactive training program developed originally to aid participants of the Breeding Bird Survey and other scientific surveys of Canadian bird species such as Breeding Bird Atlases to develop their bird song identification skills.”
The usefulness of this website extends far beyond those audiences, though. First you have to register as a user and get a username and password. Then the user can select one of three countries – Canada, the United States, and Mexico – to start, and then select from a list of species that occur in that country. For the US and Canada that list is near complete (I only noticed a few peripheral species not included, like Spectacled Eider). For Mexico there is obviously a lot of work to do, but hopefully the holes will be filled in as work on the site goes forward.
Once the user selects a species they are presented with sound recordings and photos of the selected species. The amount of audio Dendroica has is truly impressive, and draws from a wide variety of sources. Included are many species and many vocalizations not available elsewhere on the web, and the quality is universally excellent. At the moment coverage of some species is a little sparse, but presumably work is ongoing, and as more contributions are made this could become just about the most comprehensive collection of US bird songs available for free on the internet.
The little blurb below the photo gives a brief description of the primary song, and in some cases variation in song and calls. The source and documentation for the selected recording is shown just below this.
One other available feature that many users will find useful is a “quiz” button. Clicking this will give you a random sound and a list of possible answers.
Features I would really like to see Dendroica implement include more notes on what each recording includes. As it is you have to search the recordings for calls and alternate sounds/subspecies variation. If it were me, I’d divide the recordings up by vocalization type and subspecies. It would also be nice if there was more information on geographical and vocal variation.
I also find the automatic playing of one of the sounds when you select a new species account to be highly annoying, but that is in part personal preference. There are very few errors that I was able to find, quite an accomplishment when this many sounds/photos are in one place (but I also didn’t go through with a fine-toothed comb). What they have down for Omao (a Hawaiian Myadestes species) as song is actually the song of Brown-backed Solitaire, and another is that the recording they have for Black-capped Gnatcatcher either has a mislabeled location (California), or is mis-identified.
All in all I really like Dendroica, and highly recommend it.
Rufous-backed Inca-Finch, January 24, 2010, Ancash, Peru. Copyright Ian Davies.
The other new site I’m writing about here is my own, vermivora.com. I’ve just started working on it, and it’s still very much a work in progress. The main focus will be Neotropical, and will include photos, sounds, and trip reports from there and anywhere my travels take me.
The main focus of the sound part of vermivora, at the moment, will be sounds that I can’t post to xeno-canto (mammals, reptiles, and amphibians), and the “project” page. There I plan to post pages rather like the ID and taxonomy article posted here, but with a neotropical focus. Eventually this page will also include other sound resources of a tropical nature.
For an idea of what I’m talking about, take a look at the page on Inca-Finch vocalizations I posted. I probably won’t be adding new information as often as the earbirding blog is updated, but do check back occasionally to see if there’s anything new.
Finally, if you have any interest in trip reports from the tropics, part of vermivora.com will be dedicated to detailed reports of my birding trips to South America, with information on how to travel there cheaply and with public transport.
While using just a basic program such as Raven Lite will be sufficient for many recordists, you may find yourself wishing you had a more versatile program for fine-tuning your recordings. If this is the case the one I recommend is Adobe Audition. It isn’t cheap – but it is a fully professional sound-editing tool and will let you do pretty much anything you want with your sounds.
In this post I will take a sound from a raw unedited start to what I consider a finished state. Some of the editing techniques below are the same as what you can do in Raven Lite, while others will be entirely new.
Before I start writing about various ways to manipulate a recording let me stress that the cardinal rule of editing a bird sound is to not alter the target signal itself. The example I use below is a pretty simple bird sound, so it is easy to not mess with the actual song. However in more complex cases you will not be able to use many of these methods quite as thoroughly. Use your best judgment and look carefully at the sonogram before starting any editing procedures.
Disclaimer: to best hear the results of the methods below I recommend using headphones when listening to the examples. You can also see larger images of all the sonograms and pictures below by clicking on them…this will be especially useful to see the finer details of the results of some of the editing.
Step One: Crop
As before, the first step is to crop out the audio you want to edit. Audition has the HUGE advantage of being able to load and edit cuts longer than the one minute limit of Raven Lite, and you don’t have to worry about any of that annoying copying and pasting to get longer clips. In the Waveform Display view, you use the Time Selection Tool to select a portion of the recording that you want to remove, and then go to “Edit”, “Delete Selection”, or simply just hit the “delete” key on your keyboard.
Striolated Puffbird, Cristalino Jungle Lodge, Brazil. This will be the test case for the methods details below; here it is untouched except that I cropped this sample out from the original, and amplified it some to better show the differences that editing will have on it.
Step Two: Filter
This is actually more like three or four steps with Audition. I have gotten in to the habit of removing the low frequency rumble entirely, so I will describe my method for that first, then an alternate method later.
Using the Marquee Selection Tool, select the frequency range you want to remove…for most of my recordings this is from about 350-380 hertz (hz) and lower. Then go to “Edit”, “Delete Selection”. This will remove the frequency range you’ve selected, similar to using the “filter out selection” feature in Raven Lite.
Striolated Puffbird with all frequencies below 350hz removed.
Notice how on this recording there is still a band of louder low frequency noise. This is where what is perhaps Audition’s most useful tool comes in handy. Hit “Ctrl A” on the keyboard to select the entire sound, and go to “Effects”, “Filter and EQ”, “FFT Filter”.
You will see this weird box with a straight line come up. This handy feature allows you to select frequency ranges and amplify or deamplify them as much as you want. For most my recordings I amplify from a minimum amount at 750 or 800hz to around –15dB at 400hz. To place points on the line click at the approximate frequency you want the point to appear. Next right click on the point, and type in the frequency and how much you would like it amplified or deamplified. The beauty of the FFT filter is that you can smoothly deamplify across a range of frequencies, so that no abrupt “line” is apparent. Notice how after applying the filter below the band of low frequency noise is the same strength as the sounds immediately above it.
FFT Filter window. Here the sound is filtered from 750hz in a cline down to 400hz at -15dB.Striolated Puffbird after applying the FFT filter above.
But wait! The FFT filter is useful for far more than just deamplifying a small low frequency noise band. Notice that very noisy and very, very annoying band of insect noise around 3 kilohertz (khz)? Well, let’s kill it! The first step in removing insect noise is to figure out what frequencies it covers. I take the cursor and go first to just below the lower edge of the recording, and then to just above the upper one and write down those frequencies. Then I either figure out the halfway point, or the frequency of the most powerful part of the noise.
FFT filter window showing how to deamplify a frequency band in the middle of a recording, in this case with from a range of 2500 Hz to 3500 Hz, with a midpoint of 3000 Hz deamplified -25dB.
Now, back at the FFT filter window you will have to enter three points onto the graph. The first and third will be your high and low points, with an amplification of zero decibels (0 dB). The second will be the one in the middle or the height of the bug noise. For this one you can experiment with different values until you get the effect you want. Or you can compare the amplitude from the noisy part of the recording to the frequencies you used as the upper and lower bounds, and deamplify by that amount.
Striolated Puffbird with the main band of bug noise deamplified.
As a final step in the filtering process I also deamplified those two smaller bands of bug noise over the first part of the cut. You can deamplify portions of the sound by using the Marquee Selection Tool to select just the areas you want to deamplify, instead of applying the filter to the whole cut.
Remember how I promised to talk about another way to filter that lowest band of low frequency noise? Well, you can also use the FFT filter to deamplify the rumble at the bottom of the spectrum to a lower level, rather than just removing it. I remove it as a matter of personal preference, but many people prefer to leave even the lowest frequencies in their recordings and feel that it gives the cut a more natural sound.
Step Three: Clean-up
Notice all those popping and clicking sounds in this recording? Those are from a combination of handling noise – I was trying to find the bird for some clients I was leading while recording it, and thus moving around a lot – and also noise from said clients moving around. Many recordings have at least some handling noise, and it can range from merely a small annoyance to downright dreadful.
Audition offers a couple of ways to remove handling noise. The one I usually use is to select a small sliver of “clean” sound with the Marquee Selection Tool and paste it over the noisy section I want to replace. I typically try to select a piece of clean sound from close to the noisy part, but sometimes this isn’t possible. In this particular recording, note the nice clean section from 5.8 seconds to 6.6 seconds that could be used as a source of replacement sound.
Once you’ve selected the sound you are going to use to replace the noisy section, click a point on the spectrogram immediately before the part you are going to replace, and use the “mix paste” function to replace it. You can find this under the edit menu, or by using the “Ctrl+shift V” shortcut. Once you have the “mix paste” window up, click on “replace” rather than “mix”, and voila! The noisy sound will be replaced by the quieter one.
Striolated Puffbird with most of the handling noise removed. Note the quiet rustle that overlaps with the first note of the bird song that I did not remove because it overlapped with the target signal (and the harmonics thereof).
Another way to remove annoying clicks and pops is to use the “Spot Healing Brush” – this has comparable results, but I tend to use the method detailed above as a personal preference. Both these ways of removing background clicks and pops could also be used to remove other background noises — I quite often end up having to “mix paste” over some quiet talking in the background, for example. But I pretty much never remove natural background sounds, whether they be other bird species vocalizing, the noise of wings in flight, the sound of the target bird itself moving, etc. Again this comes down to personal preference, but I would rather have the sound be a better representation of the situation the bird was in than a completely sterile cut with nothing but the target species.
Step Four: Amplify
This step can actually be done at any stage in the process. I left it for the end in this discussion, but just as often I amplify right at the beginning, immediately after cropping. I actually amplified this particular recording before any of the steps I detailed above, for ease of illustration in this post.
For amplification it is best to be in the Waveform Display window, since this allows you to see whether or not the sound is clipping from over-amplification.
There are two ways you can amplify the recording. The first is to use the amplification tool, found under the edit menu, on the amplification tab. This amplifies it by a decibel (dB) amount, which I find hard to visualize. You can, however, use the Waveform Display to see how many dB the peak amplitude of the recording is below the max-out point, and then amplify by an amount less than the difference of those two numbers.
The other option is to use the “normalize” feature, also under the edit menu, amplification tab. This allows you to amplify the sound to some percentage of the maximum amplification possible. So, if you normalize to 100% it will amplify the recording to a point just below clipping. 50% will be halfway between no sound and maximum sound, and so forth. With this particular sound I will not amplify it any more than I already have, as the signal to noise ratio isn’t high enough (in my opinion). Many thanks to K. Cowcill for making me aware of this method.
Other Features
I will be the first to admit I barely scratch the surface of what Audition can do. The number of tools that you can use to tweak every aspect of your sound is simply staggering, and if you do some digging you will doubtless find additional ways of editing your sound that I haven’t talked about. One last method of filtering that I will discuss here goes way beyond the techniques I talked about above. It is also rather sketchy if you’re a purist about not touching the actual target signal itself. It is called dehissing, and it allows you to remove or deamplify ALL the background noise of your recording, leaving the target signal clearer.
But dehissing often doesn’t work well on certain types of bird sounds. I’ve found that it works best with clear whistles with little or no modulation; sounds that contain more noise or cover a broader frequency spectrum will be unacceptably altered by this process. I tend to not use dehissing much except in the rare case when I have heavy water or wind noise combined with a clear enough bird vocalization to make for an reasonable result.
Pheasant Cuckoo, Cristalino Jungle Lodge, Brazil. Note the heavy hiss from a nearby river.
Note the heavy background noise in this recording. While it would be possible to edit this cut in such a away that the background noise will be much less apparent by using the more standard techniques I talked about earlier, it would be impossible to be completely rid of a rather unpleasant amount of hissing. So, to filter the recording using the dehiss method, select the whole recording and go to “edit”, “restore”, “hiss reduction”. You’ll immediately notice a large number of options in this window, and I will freely admit that I don’t entirely understand how they all work. I typically set the precision rate at 40, the transition width at 7 dB, the spectral decay rate at 65%, and the hiss reduction amount at a varying number depending on how loud the background noise is. Finally, on the noise floor adjust level on the slider on the left, I use a number between 8 and 11, usually with some experimentation to see what results.
Pheasant Cuckoo with the hiss reduction filter applied.
Note how the hiss reduction filter more uniformly removes background noise than is possible with just the FFT filter.
I chose this sample to illustrate a tiny portion of what Audition is capable of doing…experiment with it some, be sure to save untampered originals, and let me know if you find any other useful features I haven’t talked about here!
Once you’ve come back from the field with a card full of new audio, renamed the files, and backed everything up, you may want to think about editing your sounds. While having untouched originals is useful if you’re doing scientific analyses, editing portions of the sound for posting on the internet, sending to friends, using for quizzes, etc. can make it easier to get your sound out there and heard by others.
Pretty much all the tracks used on commercial CDs of bird sounds have been edited to one degree or another, often quite heavily. Just because the recordings on, say, the Stokes Field Guide To Bird Songs sound like they were recorded in a sound room with no background noise doesn’t mean they were; quite likely most of them were the target of skillful and careful editing to bring out the target species in the recording.
I use two different programs to edit sounds. The first is Raven Lite, available free from the Macaulay Library. Though somewhat limited in its abilities, it does let you do some basic editing that, for many, will be sufficient for their sound editing needs. Detailed below is my normal process for editing recordings in Raven Lite.
Disclaimer: to best hear the results of the methods below I recommend using headphones when listening to the examples. Low frequency sounds are hard to hear over laptop speakers and small external speakers, so if you don’t hear a difference in the examples below that may be the problem.
Step One: Crop
First off I load the original recording. The first step is to select the part of the sound you want to edit…usually for me this involves cutting out any talking I did into the mic at the end of the cut, and sometime some severe handling noise from the beginning. Quite often the loaded sound is longer than the one minute maximum that Raven imposes on files…longer than that and you can’t edit it, and you have to save it in one-minute chunks. There are two ways to deal with this:
select a one minute piece that you want to have as the final edited sound and “save selection as” for your new file that you will edit, OR
copy one minute chunks and paste them into a completely new file, one after the other.
Using the second method you can get up to about three minutes of your recording into an editable file before Raven runs out of memory. Once you get over those amounts you have to create two or more files to edit and then paste them together using another program (I recommend Audacity).
Step Two: Filter
Once I have a manageable section of audio to edit, I filter out low frequency rumble (discussed in the “extra credit” box at the bottom of the Noise page), which is present in all recordings below 300-400 Hz or so. It’s more noticeable if you are recording in noisy conditions, and less noticeable if you are recording a very loud bird and the gain was turned way down.
Filtering out this low frequency band of noise can have varying consequences. If you were recording in a quiet environment it typically makes the target signal easier to hear and the whole recording more pleasant to listen to. However, if you were recording somewhere with increased background noise, such as traffic, it has the effect of making any noise that you didn’t filter out (i.e., the low frequency noise above what you filtered out) sound tinnier and unpleasant. When this is the case, there are several options. First, you can filter out a larger frequency band than normal, but this often results in a “hissy” tone to the whole recording, as in the following example:
Golden-crowned Spadebill, Cristalino Jungle Lodge, Brazil. This recording has been too agressively filtered...note the high-pitched hissy sound of the recording.
On the other extreme, you can actually filter less of the low frequency band than you would normally; quite often the whole recording will sound better with less filtered in such cases than with more. (In an upcoming post I’ll discuss advanced techniques for filtering out low-frequency noise, including frequency replacement.)
To remove the low frequency band in Raven Lite, select the frequency band you want to filter out (vertically), and then expand it horizontally to cover the entire time of the recording. Then go to edit, filter, filter out selection. This method is also useful if there is an especially loud band of insect noise in the recording, a common problem when recording in the tropics. You have to be especially careful to make sure you don’t filter out any of the target signal in these cases, though, since insect sounds are higher frequency and often overlap the bird sound you were recording.
Step Three: Amplify
After filtering, the next step I usually take is amplifying the recording. The amount I amplify is also a bit of a balancing act. When the target signal is quite loud I amplify little or none, whereas when the bird noise is very quiet I tend to amplify more.
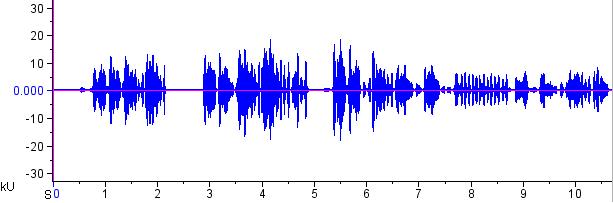
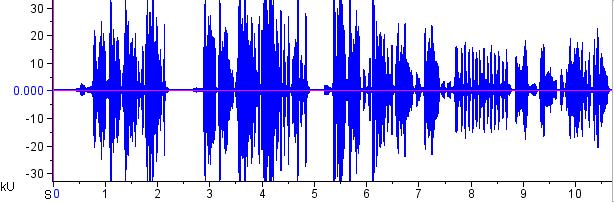
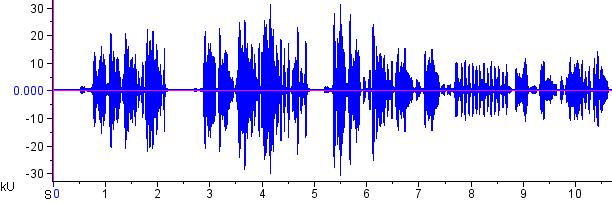
Plain-tailed Wren from Peru, unamplified
The key is not to amplify so much that the recording clips (like in the example below), but to a level approaching that. I tend not to amplify more than four or five times the current levels as this amplifies the background hiss as well, and makes the whole recording sound unpleasant. Experiment a bit with the amplification factor and find the result that sounds best to you.
Plain-tailed Wren from Peru, overamplified. Notice how the sound clips at the top and the bottom, and how the sound is distorted.Plain-tailed Wren from Peru, amplified 1.7 times. Note how the peaks come close to clipping, but don't actually max out.
Note that to deamplify you don’t use negative numbers, but fractions…i.e., a 0.9 multiplier deamplifies to 90% of the original level.
On a side note, amplification is one of the few things for which I like Raven Lite better than Audition. With Raven Lite you can pick a multiple amount to amplify by, whereas in Audition you amplify by dB. I find it easier to visualize how amplifying by a multiple will affect the recording, rather than using a more esoteric measurement like decibels.
Extra credit: the images above are waveforms, a graph showing sound amplitude versus time. The higher the peaks on the waveform, the louder the sound. An ideal recording will have the highest peaks possible for the target signal without them maxing, and also having the lowest possible amplitude during the non target signal portions of the recording.
Step Four: Clean-up
Typically my final step when editing a sound in Raven Lite is what I call “clean-up” work: removing handling noise, talking in the background, the sounds of walking, car horns, etc. Note: I personally far prefer Audition over Raven Lite for this step, but back before I started using Audition, here is what I used to do.
Since in Raven Lite you can only cut and paste timed pieces of the recording covering the entire frequency range, you have to replace the whole time span of the sound that contains the unwanted noise. To maintain natural intervals between the bird sounds themselves, I select a piece of sound with no extraneous noise that is the same length of time and paste over the section with the unwanted noise.
At the very end I will often paste a little bit of empty sound at the beginning of the cut to give a bit of lead time until the first vocalization, and sometimes a bit at the end to make the whole recording more “symmetrical”.