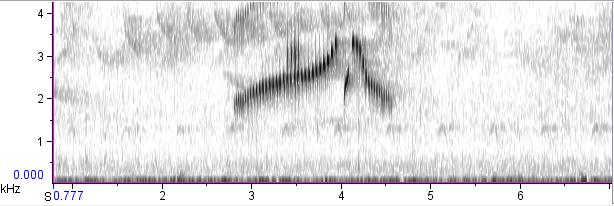
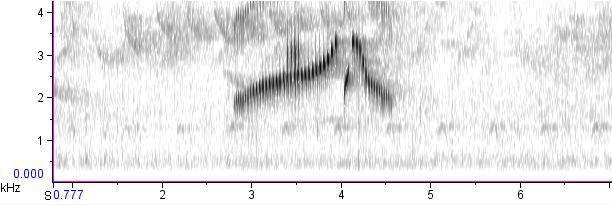
This past weekend I made my annual field trip to the Western Field Ornithologists’ conference in Palm Desert, California. Unfortunately, I had little opportunity to get out and make recordings in the field – it was a particular shame to miss out on recording at the Salton Sea, where (if you find the right spot) the most disruptive background sound usually comes from other birds, not from humans or vehicles. However, I did get to use a microphone a little bit during the Field Sound Recording Workshop that I ran on Saturday morning. While demonstrating the use of a parabola for some of the workshop participants, I was able to record these interesting sounds from a nervous flock of Gambel’s Quail:
In preparation for the workshop I drew up a brief list of equipment recommendations for those who would like to get into sound recording. I had long hesitated to do this, because I’m really not a gearhead at all – I basically know just enough about audio recording equipment to use it properly. But requests for gear recommendations are probably the single most common question that I field, and I felt it would be of use to readers if I posted the resulting info to my blog.
So, from now on you’ll see a “Recording Gear” page among the links above. Besides the equipment recommendations, the real value of the page is probably the quick links to other online resources. Please let me know if you find it useful, or have anything to add or subtract!
Nine days ago, Eric Ripma found an Orange-billed Nightingale-Thrush singing on territory in Spearfish Canyon, South Dakota. Assuming the bird is wild and arrived under its own power, it is furnishing a jaw-dropping record — only the third north of the Mexican border, apparently, over 1200 miles farther north than the species has ever been known to venture before. (See Doug Backlund’s photos here.)
Right now I’m in a hotel in Newcastle, Wyoming, on a trip to chase the Nightingale-Thrush, but that’s not why I felt it was blogworthy. Rather, I wanted to call attention to a blog entry by somebody else who saw the bird a few days ago. Cyrus Moqtaderi’s post is mostly about the guilty pleasures of chasing rare birds, but with a passing remark he sent a shiver down my spine:
I made a few rudimentary audio recordings with my camera’s microphone
Cyrus posted some of this audio to his blog; click on the link above and listen to his recording. Considering that it was the audio track of a video made with what he called a “dinky point and shoot camera,” it’s really quite excellent. It’s not going to win any awards from snobby audiophiles, but for the purpose of documenting a sound heard in the field, it’s surprisingly good.
These days, I think it’s safe to say that the majority of birders own a camera capable of taking a short video with an audio track. That is to say, most birders own a camera with a microphone in it.
That bears repeating: most birders own a microphone.
On a weekly basis, people write me asking for my recommendations when it comes to a cheap starting kit for recording bird sounds. Also on a weekly basis, I’ve receive mystery bird sounds sent to me for identification in camera-recorded videos. It took me until now to realize that the second phenomenon might provide a partial answer to the first. Maybe they won’t produce high-definition audio, but if even half of birders’ digital cameras have the power to match what Cyrus’s camera did, then these built-in camera recordings could help to fill a key gap in Joe Birder’s toolbox.
My ability to identify bird sounds mushroomed when I began recording audio. There’s something about listening to a recording that you yourself made in the field that really helps set the mental glue, so to speak. For this purpose, a camera video would work just as well as an expensive parabolic microphone. Granted, it may not be the most efficient use of your memory card, but then memory’s cheap nowadays, isn’t it? At the end of the day, if you’re really interested in audio, then by all means buy a recorder — the Olympus VN-5200PC is hard to beat for the price — but if you’re in the field for other reasons and find yourself in sudden need of an audio capture, remember your camera. It may be good for more than just boring old visuals.
While using just a basic program such as Raven Lite will be sufficient for many recordists, you may find yourself wishing you had a more versatile program for fine-tuning your recordings. If this is the case the one I recommend is Adobe Audition. It isn’t cheap – but it is a fully professional sound-editing tool and will let you do pretty much anything you want with your sounds.
In this post I will take a sound from a raw unedited start to what I consider a finished state. Some of the editing techniques below are the same as what you can do in Raven Lite, while others will be entirely new.
Before I start writing about various ways to manipulate a recording let me stress that the cardinal rule of editing a bird sound is to not alter the target signal itself. The example I use below is a pretty simple bird sound, so it is easy to not mess with the actual song. However in more complex cases you will not be able to use many of these methods quite as thoroughly. Use your best judgment and look carefully at the sonogram before starting any editing procedures.
Disclaimer: to best hear the results of the methods below I recommend using headphones when listening to the examples. You can also see larger images of all the sonograms and pictures below by clicking on them…this will be especially useful to see the finer details of the results of some of the editing.
Step One: Crop
As before, the first step is to crop out the audio you want to edit. Audition has the HUGE advantage of being able to load and edit cuts longer than the one minute limit of Raven Lite, and you don’t have to worry about any of that annoying copying and pasting to get longer clips. In the Waveform Display view, you use the Time Selection Tool to select a portion of the recording that you want to remove, and then go to “Edit”, “Delete Selection”, or simply just hit the “delete” key on your keyboard.
Striolated Puffbird, Cristalino Jungle Lodge, Brazil. This will be the test case for the methods details below; here it is untouched except that I cropped this sample out from the original, and amplified it some to better show the differences that editing will have on it.
Step Two: Filter
This is actually more like three or four steps with Audition. I have gotten in to the habit of removing the low frequency rumble entirely, so I will describe my method for that first, then an alternate method later.
Using the Marquee Selection Tool, select the frequency range you want to remove…for most of my recordings this is from about 350-380 hertz (hz) and lower. Then go to “Edit”, “Delete Selection”. This will remove the frequency range you’ve selected, similar to using the “filter out selection” feature in Raven Lite.
Striolated Puffbird with all frequencies below 350hz removed.
Notice how on this recording there is still a band of louder low frequency noise. This is where what is perhaps Audition’s most useful tool comes in handy. Hit “Ctrl A” on the keyboard to select the entire sound, and go to “Effects”, “Filter and EQ”, “FFT Filter”.
You will see this weird box with a straight line come up. This handy feature allows you to select frequency ranges and amplify or deamplify them as much as you want. For most my recordings I amplify from a minimum amount at 750 or 800hz to around –15dB at 400hz. To place points on the line click at the approximate frequency you want the point to appear. Next right click on the point, and type in the frequency and how much you would like it amplified or deamplified. The beauty of the FFT filter is that you can smoothly deamplify across a range of frequencies, so that no abrupt “line” is apparent. Notice how after applying the filter below the band of low frequency noise is the same strength as the sounds immediately above it.
FFT Filter window. Here the sound is filtered from 750hz in a cline down to 400hz at -15dB.Striolated Puffbird after applying the FFT filter above.
But wait! The FFT filter is useful for far more than just deamplifying a small low frequency noise band. Notice that very noisy and very, very annoying band of insect noise around 3 kilohertz (khz)? Well, let’s kill it! The first step in removing insect noise is to figure out what frequencies it covers. I take the cursor and go first to just below the lower edge of the recording, and then to just above the upper one and write down those frequencies. Then I either figure out the halfway point, or the frequency of the most powerful part of the noise.
FFT filter window showing how to deamplify a frequency band in the middle of a recording, in this case with from a range of 2500 Hz to 3500 Hz, with a midpoint of 3000 Hz deamplified -25dB.
Now, back at the FFT filter window you will have to enter three points onto the graph. The first and third will be your high and low points, with an amplification of zero decibels (0 dB). The second will be the one in the middle or the height of the bug noise. For this one you can experiment with different values until you get the effect you want. Or you can compare the amplitude from the noisy part of the recording to the frequencies you used as the upper and lower bounds, and deamplify by that amount.
Striolated Puffbird with the main band of bug noise deamplified.
As a final step in the filtering process I also deamplified those two smaller bands of bug noise over the first part of the cut. You can deamplify portions of the sound by using the Marquee Selection Tool to select just the areas you want to deamplify, instead of applying the filter to the whole cut.
Remember how I promised to talk about another way to filter that lowest band of low frequency noise? Well, you can also use the FFT filter to deamplify the rumble at the bottom of the spectrum to a lower level, rather than just removing it. I remove it as a matter of personal preference, but many people prefer to leave even the lowest frequencies in their recordings and feel that it gives the cut a more natural sound.
Step Three: Clean-up
Notice all those popping and clicking sounds in this recording? Those are from a combination of handling noise – I was trying to find the bird for some clients I was leading while recording it, and thus moving around a lot – and also noise from said clients moving around. Many recordings have at least some handling noise, and it can range from merely a small annoyance to downright dreadful.
Audition offers a couple of ways to remove handling noise. The one I usually use is to select a small sliver of “clean” sound with the Marquee Selection Tool and paste it over the noisy section I want to replace. I typically try to select a piece of clean sound from close to the noisy part, but sometimes this isn’t possible. In this particular recording, note the nice clean section from 5.8 seconds to 6.6 seconds that could be used as a source of replacement sound.
Once you’ve selected the sound you are going to use to replace the noisy section, click a point on the spectrogram immediately before the part you are going to replace, and use the “mix paste” function to replace it. You can find this under the edit menu, or by using the “Ctrl+shift V” shortcut. Once you have the “mix paste” window up, click on “replace” rather than “mix”, and voila! The noisy sound will be replaced by the quieter one.
Striolated Puffbird with most of the handling noise removed. Note the quiet rustle that overlaps with the first note of the bird song that I did not remove because it overlapped with the target signal (and the harmonics thereof).
Another way to remove annoying clicks and pops is to use the “Spot Healing Brush” – this has comparable results, but I tend to use the method detailed above as a personal preference. Both these ways of removing background clicks and pops could also be used to remove other background noises — I quite often end up having to “mix paste” over some quiet talking in the background, for example. But I pretty much never remove natural background sounds, whether they be other bird species vocalizing, the noise of wings in flight, the sound of the target bird itself moving, etc. Again this comes down to personal preference, but I would rather have the sound be a better representation of the situation the bird was in than a completely sterile cut with nothing but the target species.
Step Four: Amplify
This step can actually be done at any stage in the process. I left it for the end in this discussion, but just as often I amplify right at the beginning, immediately after cropping. I actually amplified this particular recording before any of the steps I detailed above, for ease of illustration in this post.
For amplification it is best to be in the Waveform Display window, since this allows you to see whether or not the sound is clipping from over-amplification.
There are two ways you can amplify the recording. The first is to use the amplification tool, found under the edit menu, on the amplification tab. This amplifies it by a decibel (dB) amount, which I find hard to visualize. You can, however, use the Waveform Display to see how many dB the peak amplitude of the recording is below the max-out point, and then amplify by an amount less than the difference of those two numbers.
The other option is to use the “normalize” feature, also under the edit menu, amplification tab. This allows you to amplify the sound to some percentage of the maximum amplification possible. So, if you normalize to 100% it will amplify the recording to a point just below clipping. 50% will be halfway between no sound and maximum sound, and so forth. With this particular sound I will not amplify it any more than I already have, as the signal to noise ratio isn’t high enough (in my opinion). Many thanks to K. Cowcill for making me aware of this method.
Other Features
I will be the first to admit I barely scratch the surface of what Audition can do. The number of tools that you can use to tweak every aspect of your sound is simply staggering, and if you do some digging you will doubtless find additional ways of editing your sound that I haven’t talked about. One last method of filtering that I will discuss here goes way beyond the techniques I talked about above. It is also rather sketchy if you’re a purist about not touching the actual target signal itself. It is called dehissing, and it allows you to remove or deamplify ALL the background noise of your recording, leaving the target signal clearer.
But dehissing often doesn’t work well on certain types of bird sounds. I’ve found that it works best with clear whistles with little or no modulation; sounds that contain more noise or cover a broader frequency spectrum will be unacceptably altered by this process. I tend to not use dehissing much except in the rare case when I have heavy water or wind noise combined with a clear enough bird vocalization to make for an reasonable result.
Pheasant Cuckoo, Cristalino Jungle Lodge, Brazil. Note the heavy hiss from a nearby river.
Note the heavy background noise in this recording. While it would be possible to edit this cut in such a away that the background noise will be much less apparent by using the more standard techniques I talked about earlier, it would be impossible to be completely rid of a rather unpleasant amount of hissing. So, to filter the recording using the dehiss method, select the whole recording and go to “edit”, “restore”, “hiss reduction”. You’ll immediately notice a large number of options in this window, and I will freely admit that I don’t entirely understand how they all work. I typically set the precision rate at 40, the transition width at 7 dB, the spectral decay rate at 65%, and the hiss reduction amount at a varying number depending on how loud the background noise is. Finally, on the noise floor adjust level on the slider on the left, I use a number between 8 and 11, usually with some experimentation to see what results.
Pheasant Cuckoo with the hiss reduction filter applied.
Note how the hiss reduction filter more uniformly removes background noise than is possible with just the FFT filter.
I chose this sample to illustrate a tiny portion of what Audition is capable of doing…experiment with it some, be sure to save untampered originals, and let me know if you find any other useful features I haven’t talked about here!
Once you’ve come back from the field with a card full of new audio, renamed the files, and backed everything up, you may want to think about editing your sounds. While having untouched originals is useful if you’re doing scientific analyses, editing portions of the sound for posting on the internet, sending to friends, using for quizzes, etc. can make it easier to get your sound out there and heard by others.
Pretty much all the tracks used on commercial CDs of bird sounds have been edited to one degree or another, often quite heavily. Just because the recordings on, say, the Stokes Field Guide To Bird Songs sound like they were recorded in a sound room with no background noise doesn’t mean they were; quite likely most of them were the target of skillful and careful editing to bring out the target species in the recording.
I use two different programs to edit sounds. The first is Raven Lite, available free from the Macaulay Library. Though somewhat limited in its abilities, it does let you do some basic editing that, for many, will be sufficient for their sound editing needs. Detailed below is my normal process for editing recordings in Raven Lite.
Disclaimer: to best hear the results of the methods below I recommend using headphones when listening to the examples. Low frequency sounds are hard to hear over laptop speakers and small external speakers, so if you don’t hear a difference in the examples below that may be the problem.
Step One: Crop
First off I load the original recording. The first step is to select the part of the sound you want to edit…usually for me this involves cutting out any talking I did into the mic at the end of the cut, and sometime some severe handling noise from the beginning. Quite often the loaded sound is longer than the one minute maximum that Raven imposes on files…longer than that and you can’t edit it, and you have to save it in one-minute chunks. There are two ways to deal with this:
select a one minute piece that you want to have as the final edited sound and “save selection as” for your new file that you will edit, OR
copy one minute chunks and paste them into a completely new file, one after the other.
Using the second method you can get up to about three minutes of your recording into an editable file before Raven runs out of memory. Once you get over those amounts you have to create two or more files to edit and then paste them together using another program (I recommend Audacity).
Step Two: Filter
Once I have a manageable section of audio to edit, I filter out low frequency rumble (discussed in the “extra credit” box at the bottom of the Noise page), which is present in all recordings below 300-400 Hz or so. It’s more noticeable if you are recording in noisy conditions, and less noticeable if you are recording a very loud bird and the gain was turned way down.
Filtering out this low frequency band of noise can have varying consequences. If you were recording in a quiet environment it typically makes the target signal easier to hear and the whole recording more pleasant to listen to. However, if you were recording somewhere with increased background noise, such as traffic, it has the effect of making any noise that you didn’t filter out (i.e., the low frequency noise above what you filtered out) sound tinnier and unpleasant. When this is the case, there are several options. First, you can filter out a larger frequency band than normal, but this often results in a “hissy” tone to the whole recording, as in the following example:
Golden-crowned Spadebill, Cristalino Jungle Lodge, Brazil. This recording has been too agressively filtered...note the high-pitched hissy sound of the recording.
On the other extreme, you can actually filter less of the low frequency band than you would normally; quite often the whole recording will sound better with less filtered in such cases than with more. (In an upcoming post I’ll discuss advanced techniques for filtering out low-frequency noise, including frequency replacement.)
To remove the low frequency band in Raven Lite, select the frequency band you want to filter out (vertically), and then expand it horizontally to cover the entire time of the recording. Then go to edit, filter, filter out selection. This method is also useful if there is an especially loud band of insect noise in the recording, a common problem when recording in the tropics. You have to be especially careful to make sure you don’t filter out any of the target signal in these cases, though, since insect sounds are higher frequency and often overlap the bird sound you were recording.
Step Three: Amplify
After filtering, the next step I usually take is amplifying the recording. The amount I amplify is also a bit of a balancing act. When the target signal is quite loud I amplify little or none, whereas when the bird noise is very quiet I tend to amplify more.
Plain-tailed Wren from Peru, unamplified
The key is not to amplify so much that the recording clips (like in the example below), but to a level approaching that. I tend not to amplify more than four or five times the current levels as this amplifies the background hiss as well, and makes the whole recording sound unpleasant. Experiment a bit with the amplification factor and find the result that sounds best to you.
Plain-tailed Wren from Peru, overamplified. Notice how the sound clips at the top and the bottom, and how the sound is distorted.Plain-tailed Wren from Peru, amplified 1.7 times. Note how the peaks come close to clipping, but don't actually max out.
Note that to deamplify you don’t use negative numbers, but fractions…i.e., a 0.9 multiplier deamplifies to 90% of the original level.
On a side note, amplification is one of the few things for which I like Raven Lite better than Audition. With Raven Lite you can pick a multiple amount to amplify by, whereas in Audition you amplify by dB. I find it easier to visualize how amplifying by a multiple will affect the recording, rather than using a more esoteric measurement like decibels.
Extra credit: the images above are waveforms, a graph showing sound amplitude versus time. The higher the peaks on the waveform, the louder the sound. An ideal recording will have the highest peaks possible for the target signal without them maxing, and also having the lowest possible amplitude during the non target signal portions of the recording.
Step Four: Clean-up
Typically my final step when editing a sound in Raven Lite is what I call “clean-up” work: removing handling noise, talking in the background, the sounds of walking, car horns, etc. Note: I personally far prefer Audition over Raven Lite for this step, but back before I started using Audition, here is what I used to do.
Since in Raven Lite you can only cut and paste timed pieces of the recording covering the entire frequency range, you have to replace the whole time span of the sound that contains the unwanted noise. To maintain natural intervals between the bird sounds themselves, I select a piece of sound with no extraneous noise that is the same length of time and paste over the section with the unwanted noise.
At the very end I will often paste a little bit of empty sound at the beginning of the cut to give a bit of lead time until the first vocalization, and sometimes a bit at the end to make the whole recording more “symmetrical”.
If you are getting into nature sound recording, I’ve got a few recommendations for how to manage your recordings as the number of files grows.
Storage
The first thing you need to do is dedicate a storage space either on your computer’s hard drive or on an external hard drive. Unless you’re recording in MP3 format, which doesn’t take up much space, I recommend the external drive. Memory is getting cheaper and cheaper — I just purchased 300 gigabytes for $75 — so it shouldn’t break the bank.
Once you’ve got the drive, you need to decide on a filing system. Personally, I prefer to put all the original (unedited) recordings in a single dedicated folder where they will sort chronologically by filename (see below), but if you prefer to split things up into multiple folders, more power to you. Regardless, I strongly recommend keeping your original files separate from your edited files — the original files should reside in an “inviolate library” from which all else issues.
Filenames
Once you’ve got a place to put your files, make sure you rename them so that you know which one is which. Don’t let them sit around telling you “Scene_162.wav” or “20100312_h13m24s42.wav”.
Good filenames must do the following:
Tell you about the contents of the file (even if only in code);
Never reduplicate or repeat each other.
In my opinion, good filenames should also:
Sort chronologically. Personally, I would never dream of sorting the original audio files by species. For one thing, many of my cuts include the vocalizations of two or three (or ten) different kinds of birds at once. For another thing, it’s frequently important to know the order in which the cuts were recorded on a particular day. Edited files are a different story; I sort those by species, but the originals need to be chronological.
Include information about species, date, and place (and maybe recorder and recordist while you’re at it). This can make for long filenames, so some people might prefer to keep that information in the master index (see below), but I find it very useful to put this information in filenames, which makes the files searchable in several programs.
Here’s a sample filename to show you a system like the one I use:
AJS-2008-06-24-t48-SWTHalarm_YBFLc-CoosCoNH.wav
which includes:
AJS: the initials of the recordist (Andrew J. Spencer);
2008-06-24: the date (in year-month-day format so that files will sort chronologically);
t48: a track number (so that all recordings made on the same day will sort chronologically);
SWTHalarm_YBFLc: notes on the vocalizations recorded (in this case, Swainson’s Thrush alarm calls and Yellow-bellied Flycatcher calls);
CoosCoNH: the location (Coos County, New Hampshire).
To make it feasible to rename dozens or hundreds of files at once, I suggest a batch renaming program. The one I use is called Siren. It’s not very intuitive for beginners, but I love it. Once you learn how to create filename expressions in Siren, you can rename hundreds or thousands of files according to the same pattern, and that pattern can automatically incorporate other parts of the current filename, the date/time the file was created or modified, metadata from the audio ID tags, an increasing series of numbers, or other nifty strings.
Using Siren, I can simultaneously rename a hundred recordings at once, instantly giving them all the recordist’s initials, the date, a unique track number, and a location. Then I can go through and listen to each file, manually adding the vocalization information. The last step takes some time, but twice as much time is saved when I’m looking for something I recorded last year!
Create a Master Index
Somewhere, you’ll need to keep a master list of all the sound files you’ve recorded, and you’ll need to keep it updated. Personally, I use a simple Microsoft Excel spreadsheet that includes more detailed information about each file than the filename can hold: it has columns for filename, date, species, location, recorder, microphone, backups (see below), and comments.
One nifty trick I learned from this webpage was how to add a “Print Directory Listing” option to my Windows right-click menu. Following the instructions on that page, I was able to set up my computer so that when I right-click on a folder, I can choose the option to create a text file with a listing of all the files in the folder. I can import this into Microsoft Excel at the drop of a hat, which makes updating my Master Index a breeze.
Back it up! Now!
Even if you follow none of the above advice, you absolutely must back up your files. I recommend backing them up to DVD because DVDs are relatively durable, portable and spacious. Believe me, investing in a DVD burner is totally worth it if your recording output is going to be measured in hours and gigs rather than minutes and megs.
When it comes to long-term audio archival, you’ll want to investigate other options, most of which are beyond the scope of this post. However, I will mention that you might want to consider donating your recordings to a research archive. That way, your recordings will be available to researchers in the future — including you, if disaster strikes your original data and your backups.
Andrew Spencer recording a Gould's Toucanet, Cristalino Lodge, Brazil, September 2009. Click to hear the recording.Andrew's current recording rig: a 22-inch Telinga parabola with a Sennheiser ME62 microphone and a Fostex FR2-LE digital recorder. Note the duct tape, sweat stains, etc.
I’ve been bugging my old buddy Andrew Spencer to send me a recordist profile for months now, but until this week he was too busy slogging around South America. Now he’s on a stateside break until July, when he’s headed back to the Bird Continent to take up residence as a professional birding tour guide.
Ten years ago Andrew and I used to take off on birding trips all weekend every weekend, not to mention most days after school. After I caught the recording bug, it wasn’t too long before Andrew caught it too. Now, he’s the top contributor to Xeno-Canto, with 2500+ of his recordings online.
I’m pleased to say that I’ve added Andrew as an Earbirding author, so you’ll be seeing occasional posts by him on this site from now on. I figured it was a good idea to introduce him to his audience before handing him a keyboard — hence this author profile.
Here’s what Andrew has to say about himself and his recording.
I started watching birds when I was about five, but didn’t start recording until after my first trip to South America, to Ecuador in 2006. While there I realized that the ability to record birds in the tropic was absolutely fundamental to fully enjoying South American birding, and as soon as I got back I bought my first recording rig.
In the few years since then I have become ever more deeply obsessed with recording…what at first was something to help call unknown birds in and document unknown sounds for later identification became a quest to record as many species, song, and call types as I could. As a result I have traveled around much of the US and South America recording birds.
Since I started recording I have used a number of different recording rigs, in the following chronological order:
Sony HD mini-disc with a Sennheiser me66 shotgun mic
This was my first rig, and a basic yet ultra portable setup. The minidisk recorder did a decent job in terms of recording the sound, but had several serious drawbacks, chiefly the lack of ability to manually adjust the gain. [listen to a Yellow Rail Andrew recorded with this rig]
Oade modified Marantz PMD660
I used this recorder with both my shotgun mic and with a Telinga Parabola I later purchased. Of all the recorders I’ve used this was by far my favorite; it had remarkably clean and powerful preamps, approaching those of high-end recorders. It did have some durability problems, and repeated exposure to high humidity in the tropics caused problems with the output lines. [listen to a Tepui Wren recorded with Marantz & shotgun, and a Golden-cheeked Warbler recorded with Marantz & parabola ]
Fostex FR2-LE
My current recorder, I got this on short notice to replace the malfunctioning Marantz. As a whole it does a decent job, but the preamps are noticeably noisier and less powerful that the Marantz, and the rig as a whole is less durable in my opinion. I mostly use a Telinga Parabola and a Sennheiser me62 omnidirectional microphone with the Fostex, which produces acceptable but usually not stellar results. [listen to a Peruvian Plantcutter recorded with Fostex & parabola]
I use a couple of different recording styles while in the field, depending on where I am and who I am with. In North America I usually have a small list of targets that I want to record, and if I find a vocalizing bird I stick with it for a long time trying to get different sounds out of it. Other times, especially if I am on a trip to an area I don’t go to much or with non-recordists I will record a bird making noise but move on fairly quickly to the next species.
I tend not to use headphones while recording, even with the parabola. While using headphones does allow one to pinpoint a singing species with more precision I find that it also makes it harder to hear other birds singing around you, and the process of putting on an removing the headphones both eats up time and is really quite annoying. With practice I feel it is possible to pinpoint a target with a fair degree of accuracy and by watching the meters on the recorder. Since I don’t use headphones I also rarely use the wind coat for that parabola, since this allows me to look through the clear dish and at the bird, if it is visible, and pinpoint it without having headphones.
Unlike some recordists I am a big believer in post recording editing. Typically I will filter out low frequency rumble if it doesn’t overlap the target signal, amplify the recording if it is very quiet, and if necessary remove background talking and handling noise. For editing sounds I recommend Raven Lite, available free from the Macaulay Library, and for more advanced editing Adobe Audition.
Bird recordists don't often use boom microphones like this, but I couldn't resist the image. Photo by Joel Hay (Creative Commons 2.0).
Eric DeFonso has been toying with the idea of getting into sound recording for some time. On his blog, he reports that he’s finally taking the plunge.
Eric hesitated about getting into sound recording for the same reason I did originally — he thought all the good recordings had been made already. But I think nothing is further from the truth, and it seems I managed to convince him of that. Now he’s signed up for the 2010 Macaulay Sound Recording Workshop.
Here’s a quick thought experiment. Take a moment to think about how many people you know who take bird photographs as a hobby. Now think about how many amateur sound recordists you know. The second number is far smaller than the first, of course.
Here in Colorado alone, the photo editor for our journal Colorado Birds has a list of over 30 people he can call on when he needs publication-quality bird photos. The list isn’t even close to comprehensive, and it only samples amateurs. Meanwhile, I can only think of six people in the state who record bird sounds at all — and that includes a couple who are just getting started, one who basically retired from sound recording years ago, and one who barely spends any time in the state anymore.
Why are people still taking bird photos? Why are they still taking up the hobby? Haven’t all the good photographs been taken? No, of course they haven’t. So why worry that all the good sounds have been recorded?
People take photos for many reasons — for enjoyment, for aesthetic pleasure, to memorialize their experiences, to teach themselves something. All these reasons are just as valid when it comes to sound recording. A sound recording can snap you back to a particular place and time, right into the middle of an old experience, in a way that even a photo can’t do. It’s one of the reasons why radio is still alive and well in the era of the Internet.
Just some things to think about if you, too, have been tempted to take the sound recording plunge.
American Tree Sparrow, 2/11/2007. Photo by Eric Begin (Creative Commons 2.0).
A frequent topic of discussion on this blog is what we don’t know about bird sounds. Another favorite topic is how amateur recordists might help solve mysteries — and advance science — by recording common birds in their own backyards. Now, as most of North America languishes in the middle of a deep, dark winter, I’d like to point out a golden opportunity for citizen science — a chance to answer questions about a bird that many people know, but few really understand.
I never used to pay much attention to American Tree Sparrows. In the places I lived, they weren’t common enough to be really familiar, but they weren’t rare enough to be noteworthy either. For the first couple of years that I recorded bird sounds, I made no particular effort to record them, even though they can be found in winter with ease not far from my house. I just didn’t think they had much to say.
Boy, was I was wrong.
In fact, American Tree Sparrows appear to have one of the most varied vocal repertoires of any sparrow. I’ve recorded winter flocks on about a dozen occasions now, and listened to a good number of recordings at the Macaulay Library. The more I listen, the more mystified I become.
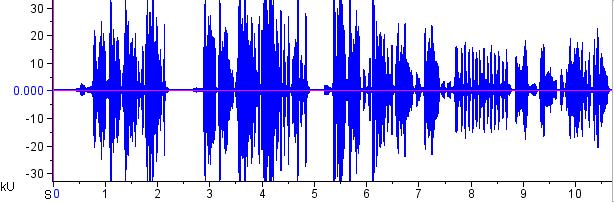
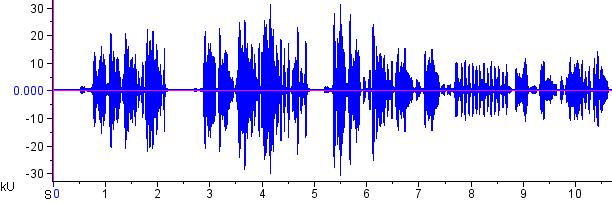
The most distinctive winter vocalization of the American Tree Sparrow is the “flock call,” described by many authors as a two- or three-syllabled musical note:
American Tree Sparrow flock calls, Yuma County, CO, 12/27/2008.
In and of itself, I find the flock calls interesting, because they sound so different from anything I hear from other sparrows, and because the spectrogram shows them to be so complex. But the more recordings of flock calls I made, the more confused I got, because it started to look like no two flocks give the same flock calls:
American Tree Sparrow flock calls, Yuma County, CO, 12/27/2008.American Tree Sparrow flock calls, Lincoln County, SD, 12/13/2009.American Tree Sparrow flock calls, Brown County, SD, 12/15/2009.
The incredible variety between individuals (and within individuals) strongly suggests that the flock calls of American Tree Sparrows are learned, not innate. This is interesting and unexpected; as far as I know, complex learned calls are unknown in any of the Tree Sparrow’s close relatives.
Even more interesting is that the limited sample of recordings I’ve studied seems to hint that flockmates give flock calls that are, if not identical, at least broadly similar — while a flock just down the road might sound different. Will further recordings support this observation or disprove it? Either result would raise further questions. Do Tree Sparrows learn their flock calls on the breeding grounds, during migration, or on the wintering grounds? Do they change their flock calls over time? If they learn from flockmates, are flock calls a way of keeping the same group of birds together all winter? If so, why? What happens when a bird with a different kind of call joins a flock?
At first glance, the situation surrounding these complex, apparently learned calls bears more resemblance to the vocal repertoires of some cardueline finches than to the vocal repertoires of any other North American sparrow. Unraveling the entire mystery would be a good dissertation topic for some motivated doctoral student in ornithology.
But I’m short on motivated doctoral students at the moment. Here’s my question: can amateur recordists get a start on solving these questions? I’d like to find out.
If you’ve got recording equipment and ready access to American Tree Sparrows, I challenge you to get out and make some recordings of your local flock.
Take notes out loud while you are recording (not the entire time, of course; it’s necessary to let the birds speak uninterrupted for at least part of the recording). In your notes, mention the date, the location, the weather, and the species — and most importantly, try to say what you observed the birds doing, and which sounds correlated with which behaviors, and which individuals were vocalizing when.
If you’ve got a local flock that sticks around most of the winter, follow it over time and pay attention to how many birds it includes. Do flocks split and re-merge? Do they stay separate over the course of the winter? If the number of sparrows in your hedge varies from 5 to 50 and back all winter, we can surmise that flocks split and merge.
Let me know of what you are doing via email. If people actually do this and we collect enough data, we might be able to answer some of the basic questions about these flock calls, and we might be able to put together a paper for publication.
Bob Zilly, 1/25/2009.Bob's two recorders. Left: Olympus LS-10 Linear PCM Recorder; right: Olympus VN-5200PC Digital Voice Recorder.
Bob Zilly of Longmont, Colorado describes himself as a “casual and opportunistic” recordist. I’m excited to profile Bob in this first post of 2010 not only because he’s a terrifically nice guy, but also because I think his recording style and equipment will appeal to many readers who might like to get into audio recording in a relatively quick, easy, and inexpensive way.
Bob uses the simplest kind of digital recording device: handheld voice recorders. No external microphone, no headphones, no cords or cables to worry about (unless you want them). At right you can see his two rigs:
Olympus VN-5200PC Digital Voice Recorder (right). This thing retails for well under $100. It records only in a compressed format (WMA), which won’t do for some audio purists, but it really doesn’t distort bird sounds either, as far as I can tell. For someone who just wanted to dabble in recording — say, brushing up on the local songs, documenting the occasional rarity, maybe even determining a crossbill type from time to time — this model would be ideal.
Olympus LS-10 Linear PCM Recorder (left). For a couple hundred dollars more, this machine allows higher-quality recording, eliminating the compression that MP3 and similar formats introduce. Both this and the above recorder can be operated with an external shotgun microphone if desired.
Here’s what Bob had to say about why he records, and how he likes his equipment:
Several years ago I bought a digital voice recorder to replace pen and paper for keeping lists. I found that while playing back the recordings I could sometimes hear the bird I was talking about. After that I would sometimes record the sounds of birds that I didn’t know in order to help identify them.
Mind you, voice recorders certainly have limitations. The microphone’s pickup pattern is less than desirable and I often hear airplanes, insects, and handling sounds on my recordings. I sometimes yearn for a shotgun or parabolic mic to pick up faint sounds and exclude background noise — but then again my equipment fits in my shirt pocket and I can be recording in the time it takes to pull it out of my pocket and press a button. I don’t usually go out specifically to record bird sounds but since the recorder is always in my pocket I can record whenever an opportunity presents itself.
I also recently bought a true high-fidelity pcm recorder (the Olympus LS-10) but I’m still just using the built in microphones and have just started playing around with it. Jury is still out on whether I like it. I tried setting record levels manually on some quiet sounds and this led to lots of amplifier noise because I had to crank the levels up a lot to see anything on the VU meters. Later I tried using the auto record level function but then the quiet sounds were barely audible. I think my voice recorder did a better job. I’ll play with it some more but I may have to think about getting a shotgun mic and possibly an external preamp too so I can use line in.
It’s true, of course, that the single most important piece of equipment in a recording rig is the microphone, and these handheld recorders don’t have the best built-in microphones; they’re designed for a human voice at a distance of a couple of feet, not a Song Sparrow 80 meters away. But for those who simply want basic recording capabilities when the opportunity arises, these things can work pretty well, as this recording by Bob shows. I’ll let him introduce it:
I was visiting my mom in Illinois and woke up at 4:00 AM and heard this guy. I just opened the window and grabbed the voice recorder. The hum is from the building next door, not the recorder. Because of the hum and the bugs its not the best recording but rather an example of how opportunistic you can be with simple equipment.
Not too shabby! Here’s hoping that Northern Cardinal helps inspire others to follow Bob’s lead and get into recording, even if it’s just the casual kind!
A while back I mentioned my long-standing desire to post a list of things we don’t know about North American bird sounds, with an emphasis on the simple questions that amateur sound recordists could answer. I’ve finally decided to take a crack at it.
Below, you’ll find my first attempt to list some things we don’t know. It’s not even close to an exhaustive list, nor is it necessarily up-to-date — it’s merely a teaser, mostly based on a quick perusal of a few select BNA accounts. My whole purpose is to inspire some amateur research projects. Most of these are questions that amateurs can answer in whole or in part. You might be surprised at what you could contribute to science with a little time and energy.
Song Repertoire
How many different songs can one male bird sing? This question can be easily answered by simply recording singing individuals for an extended period. The answer is sometimes quite different even between closely related species, or within populations of a single species. Here are some birds whose song repertoires are poorly known.
Northern Shrike
Loggerhead Shrike
Mountain Bluebird
Virginia’s Warbler
Black-and-white Warbler
Hepatic Tanager
Lark Sparrow
Dickcissel
Orchard Oriole
Begging Calls
An easy way to contribute is to record the sounds of young birds, either in the nest or out of it. Ideally, locate a nest and monitor it, noting the dates of hatching and fledging, and making recordings on a regular basis in between, to document the development of the sounds.
Mountain Bluebird
Lucy’s Warbler
Dickcissel
Blue Grosbeak
Spotted Towhee
Geographic Variation
Birds in this category may sound different in different parts of their range. Some of these differences may have taxonomic implications. On the other hand, some of these birds may not sound much different across their ranges; we don’t really know.
Cave Swallow
Curve-billed Thrasher
Spotted Towhee (calls)
Great-tailed Grackle
Call Repertoire
The birds in this category may make sounds that do not appear on commercially available bird sound recordings and are poorly described in the scientific literature. To solve the problem, we need recordings of all the sounds birds make — not just the pretty ones, or the loud ones — plus detailed notes on the behavioral context of the sounds: what was the bird doing when it made the sound? What time of year and day was it? What was the bird’s age and sex? And so forth.
Clark’s Grebe
Common Moorhen
Olive-sided Flycatcher
Greater Pewee
Loggerhead Shrike
Blue Grosbeak
Vesper Sparrow
American Tree Sparrow (more on this in an upcoming post)
Pine Siskin
Bullock’s Oriole
Spectrographic Analysis
Many vocalizations have been described in the literature only phonetically, and it can be difficult to determine which call the author was hearing — or which one you are hearing — unless you have spectrograms to compare. These species could use a formal description of repertoire with spectrograms:
Northern Shrike
Phainopepla
Common Myna
Bewick’s Wren (calls)
Rock Wren
Hepatic Tanager
Summer Tanager
Lark Sparrow
Flight Calls
Not enough flight calls have been recorded from these species (during the daytime) to determine the limits of variation in the sounds they might make during nocturnal migration.
MacGillivray’s Warbler
Western Tanager
Black-headed Grosbeak
Brewer’s Sparrow
Western Meadowlark
Other Questions
Goldfinches (at least Lawrence’s and Lesser, and probably American also) apparently sing two types of songs: a long, continuous one and a disjointed one that sounds like a long string of calls. The two song types grade into one another. The disjointed song has never been described in the literature and its purpose and behavioral context remain unknown.
Male Painted Buntings may continue learning new songs after their first year of breeding; extensive recordings of the same individual across multiple years would help resolve the question.
The BNA account on Bullock’s Oriole says that “Males seem to sing only a single song,” but I suspect the situation is much more complex, as it is in the closely related Baltimore Oriole. Shall we find out?
And that, folks, is just what I found in a perusal of roughly 50 BNA accounts. This is just scratching the surface. Note how many common and widespread species are on the above lists. Everybody in North America can contribute if they’ve got the time — and especially if they have recording equipment.
If you’ve got anything to add to this list, post it in a comment! I’ll try to get a master list put together eventually.